Easy Japanese Tuna Onigiri Quick Recipe
15-min. Easy Japanese Tuna Onigiri is your new best friend when hunger strikes! Imagin extracte this: a perfectly formed rice ball, warm and comforting, bursting with a savory, flavorful tuna filling, all ready in a flash. What’s not to love about that? These delightful little parcels are a cornerstone of Japanese bento boxes and grab-and-go snacks for a reason. They offer a satisfying, wholesome bite that’s incredibly versatile and wonderfully simple to make. The magic of Japanese Tuna Onigiri lies in its minimalist approach; a few quality ingredients transform humble rice into something truly special. It’s the perfect antidote to busy schedules, proving that delicious, authentic flavors don’t need to take hours to prepare. Whether you’re a seasoned home cook or a complete begin extractner, mastering this 15-min. Easy Japanese Tuna Onigiri recipe will add a fantastic, speedy option to your culinary repertoire.
Why You’ll Love This Recipe:
Speedy and Delicious
Perfectly Portable
Simple, Yet Satisfying
15-Min Easy Japanese Tuna Onigiri
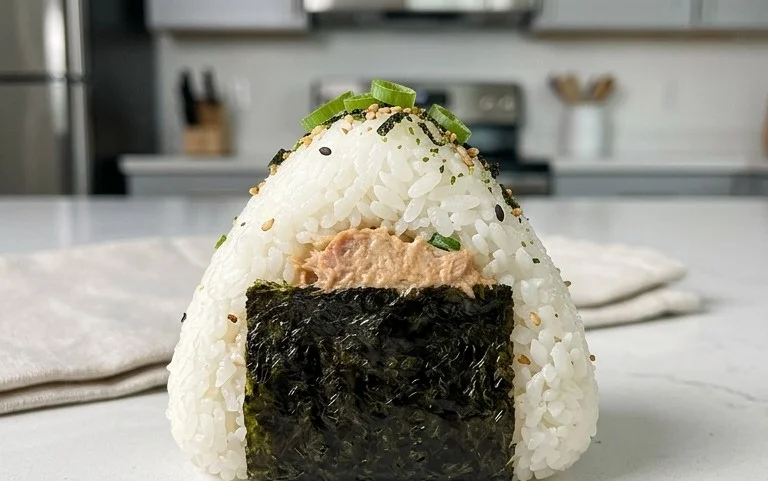
Craving a quick, satisfying, and authentically Japanese snack or light meal? Look no further than Tuna Onigiri! These delightful rice balls are incredibly versatile and can be prepared in under 15 minutes, making them perfect for busy weeknights, packed lunches, or anytime you need a little taste of Japan. The combination of fluffy rice, savory tuna, and creamy mayonnaise is simply irresistible, and the optional nori wrap adds a wonderful salty crunch. Plus, they’re incredibly easy to customize to your liking. Let’s get started!
Ingredients:
Cooking Instructions
The beauty of onigiri lies in its simplicity. We’re not really “cooking” in the traditional sense, but rather assembling delicious components into perfectly portable rice balls.
1.
Prepare the Tuna Filling
This is where the flavor really starts to build! Open your can of tuna and drain off any excess liquid. If you’re using tuna packed in oil, draining is especially important to avoid an overly greasy filling. Transfer the drained tuna to a small bowl. Add the Japanese mayonnaise (or your regular mayonnaise). Japanese mayonnaise, like Kewpie, has a richer, tangier flavor profile that’s fantastic in onigiri, but regular mayonnaise will work perfectly well too. Mix the tuna and mayonnaise together until well combined. You want a creamy, spreadable mixture. You can add a tiny pinch of black pepper if you like, but it’s not essential. Taste it and adjust the mayonnaise if needed. The consistency should be moist but not runny.
2.
Season the Rice
While the tuna mixture is resting, let’s get our rice ready. If you’re using freshly cooked short grain rice, ensure it’s still warm but not scalding hot. Warm rice is much easier to mold. If your rice has cooled down, you can gently warm it in the microwave for about 30-60 seconds. In a separate small bowl, mix the 1/2 teaspoon of salt with about 2 tablespoons of warm water. This helps distribute the salt evenly throughout the rice. Gently pour this salt water over the cooked rice. Using a rice paddle or a spatula, carefully fold the salt water into the rice. The goal here is to evenly season every grain without mashing the rice. You want to coat the rice grains with the salt, not stir vigorously.
3.
Assemble the Onigiri
Now for the fun part: shaping! It’s helpful to have a small bowl of water and a little extra salt (about 1/4 tsp) nearby for your hands. Wet your hands thoroughly with water and then sprinkle a little salt onto your palms. This prevents the rice from sticking to your hands and adds a little extra seasoning to the exterior of the onigiri. Take about 1/2 cup of the seasoned rice and place it in the palm of your hand. Create a slight indentation in the center of the rice with your thumb. This indentation is where we’ll place our delicious tuna filling.
4.
Fill and Shape
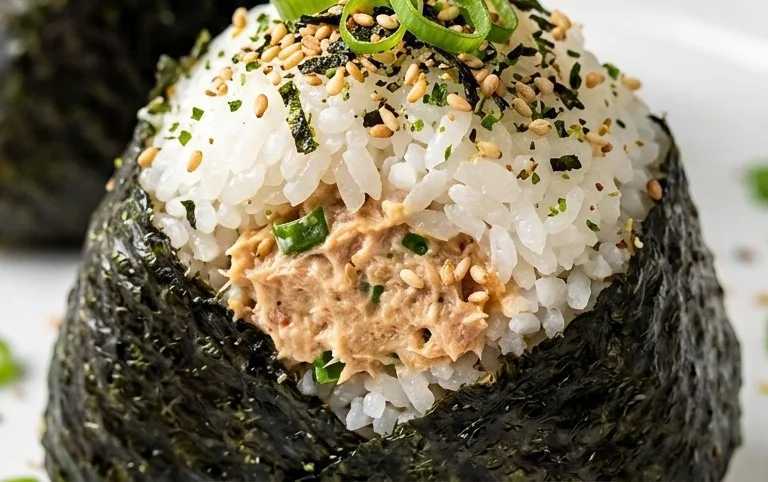
Spoon about 1 to 1.5 tablespoons of the tuna mayonnaise mixture into the indentation you made in the rice. Don’t overfill, or it will be difficult to seal. Now, gently gather the edges of the rice around the filling, carefully enclosing it completely. Begin extract to gently pat and shape the rice into your desired form. The most traditional shapes are a triangle or a ball. For a triangle, cup your hands to form a flat base, then use your fingers and the palm of your other hand to form the other two sides, creating a sturdy triangle. If you prefer a ball, simply cup your hands and gently roll the rice until it forms a compact sphere. The key is to apply even pressure so the onigiri holds its shape without becoming too dense or hard. If the rice starts sticking, re-wet your hands and add a touch more salt.
5.
Add the Nori (Optional but Recommended!)
This step is what elevates your onigiri from simple rice balls to classic Japanese snacks. If you’re using whole sheets of nori, you can cut them into strips about 1 inch wide and 3-4 inches long. These are perfect for wrapping around the base of a triangular onigiri or for partially encasing a round one. Gently press the nori strip onto the onigiri. The moisture from the rice will help it adhere. If you prefer less nori, simply use a smaller piece or a half sheet, tearing it to fit your onigiri. For an extra touch of flavor and visual appeal, you can sprinkle the top of your onigiri with the sesame seeds. This is entirely optional but adds a nice nutty aroma and a bit of texture.
Enjoy your freshly made 15-Minute Easy Japanese Tuna Onigiri immediately for the best taste and texture. They’re perfect for a quick lunch, a satisfying snack, or even a light dinner. You can also pack them for picnics or school lunches, though they are best enjoyed within a few hours of making.
Notes:
Conclusion:
There you have it – your super simple guide to making delicious 15-min. Easy Japanese Tuna Onigiri! This recipe is an absolute lifesaver for busy weeknights, quick lunches, or even a satisfying snack. The beauty of these rice balls lies in their incredible speed, minimal ingredients, and customizable nature. You get the comforting chegrape juicess of perfectly cooked rice, the savory burst of tuna, and the satisfying shape that makes them so iconic. Whether you’re a seasoned home cook or just starting out, this Japanese tuna onigiri is a fantastic way to explore Japanese flavors with confidence. I truly encourage you to give this a try – I guarantee you’ll be hooked on how easy and rewarding it is!
For serving suggestions, these onigiri are perfect on their own, or you can serve them with a side of miso soup, a crisp green salad, or some pickled gin extractger for an extra zing. Feel free to experiment with variations! Beyond the classic tuna mayo, try mixing in chopped cooked salmon, seasoned seaweed (wakame), or even some finely diced kimchi for a spicy kick. You can also get creative with your outer coatings – toasted sesame seeds, furikake (Japanese rice seasoning), or even a light dusting of shichimi togarashi (Japanese seven-spice blend) are wonderful additions.
Frequently Asked Questions:
Can I use different types of rice?
While short-grain Japanese rice is ideal for its stickiness and texture, you can experiment with other short-grain or medium-grain white rice. Just be sure to adjust the water ratio slightly as needed to achieve a good, moldable consistency.
What if I don’t have mayonnaise?
No worries! You can substitute the mayonnaise with a little bit of Japanese kewpie mayo if you have it, or even plain yogurt mixed with a touch of soy sauce and a pinch of black pepper for a creamier, tangy alternative.
How should I store leftover onigiri?
Onigiri are best enjoyed fresh, but if you have leftovers, wrap them tightly in plastic wrap or an airtight container. They can be stored in the refrigerator for up to a day. Reheat them gently in a microwave or a lightly oiled pan until warmed through.
15-min. Easy Japanese Tuna Onigiri
Quick and simple Japanese rice balls filled with seasoned tuna and mayonnaise. Perfect for a light meal or snack.
Ingredients
-
2 cups cooked short grain rice
-
1/2 tsp salt
-
5.29 oz canned tuna (in oil recommended, or canned tuna in water)
-
2 tbsp Japanese mayo (or regular mayonnaise)
-
2 sheets nori (or use 1/2 sheet if you prefer less)
-
1 tsp sesame seeds (for garnishing, optional)
Instructions
-
Step 1
Mix the warm rice with salt and let it cool slightly until it’s comfortable to handle. -
Step 2
In a small bowl, drain the canned tuna and mix it with the mayonnaise. If using tuna in oil, drain most of it. -
Step 3
Wet your hands slightly with water and pinch off a portion of rice (about 1/2 cup). Flatten it in your palm. -
Step 4
Place about 1-2 tablespoons of the tuna mixture in the center of the rice. Be careful not to overfill. -
Step 5
Gently form the rice around the filling, shaping it into a triangle or ball. Repeat with the remaining rice and filling. -
Step 6
Cut the nori sheets into strips. Wrap a strip of nori around the base of each onigiri. -
Step 7
Optional: Sprinkle sesame seeds over the onigiri for garnish.
Important Information
Nutrition Facts (Per Serving)
It is important to consider this information as approximate and not to use it as definitive health advice.
Allergy Information
Please check ingredients for potential allergens and consult a health professional if in doubt.