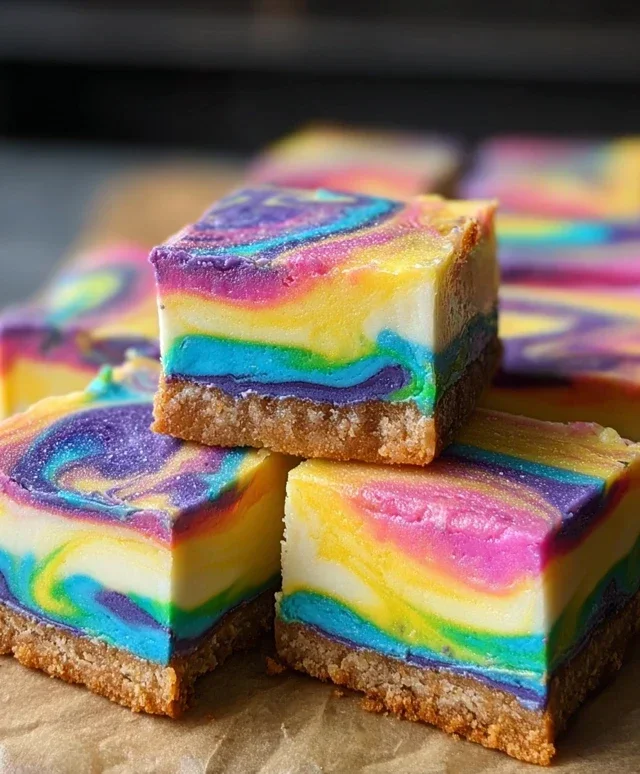
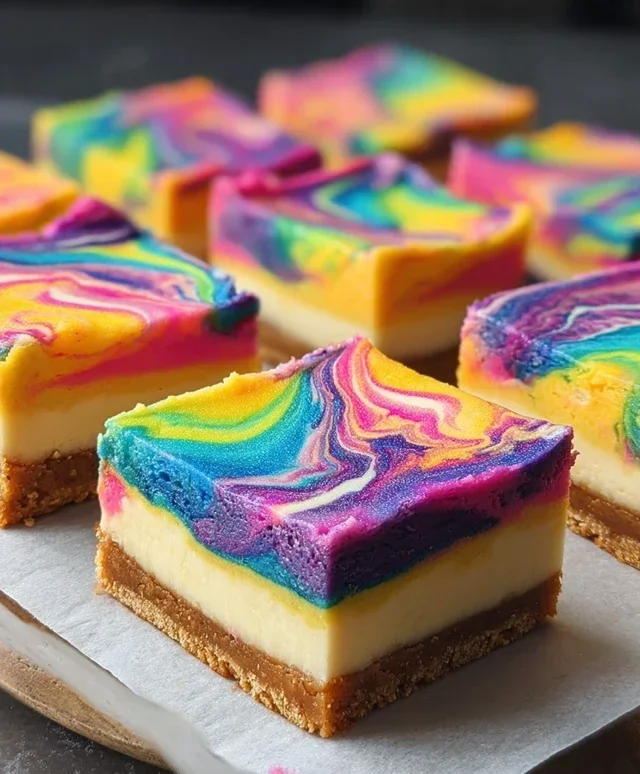
Rainbow Cheesecake Swirl Bars – Easy & Delicious
Rainbow Cheesecake Swirl Bars are about to become your new favorite dessert, and for good reason! Who can resist the playful charm and irresistible creaminess of a cheesecake, especially when it’s presented in such a visually stunning way? These aren’t just any bars; they’re a vibrant masterpiece, bursting with color and delightful, tangy cheesecake flavor. We love them because they’re the perfect bite-sized treat, offering all the rich indulgence of a traditional cheesecake without the fuss of a springform pan. What truly makes Rainbow Cheesecake Swirl Bars special is the magical marbling effect that creates a unique swirl in every single bar. Imagin extracte a creamy, dreamy cheesecake base infused with a spectrum extract of fruity colors – it’s a dessert that’s as delightful to look at as it is to devour. Get ready to impress your friends and family (and yourself!) with this show-stopping, crowd-pleasing recipe.
Rainbow Cheesecake Swirl Bars
Get ready to bake up a truly delightful treat that’s as beautiful as it is delicious! These Rainbow Cheesecake Swirl Bars are a celebration of vibrant colors and creamy cheesecake goodness, all nestled on a tender cakey base. They’re perfect for parties, holidays, or just whenever you need a little extra sparkle in your day. The swirling technique might seem intimidating, but I promise, it’s simpler than you think and the results are absolutely stunning. Let’s get started on creating these edible works of art!
Ingredients:
Baking the Cake Base
First things first, let’s get our foundation ready. Preheat your oven to 350°F (175°C). Grease and flour a 9×13 inch baking pan, or line it with parchment paper, leaving an overhang on the sides to make lifting the bars out easier later. In a medium bowl, combine the contents of the white cake mix, the melted butter, 1 egg, and 2/3 cup of milk. Mix these ingredients together until just combined and no dry streaks of cake mix remain. Be careful not to overmix; overmixing can lead to a tough cake base. The batter will be thick, which is exactly what we want for this recipe. Spread this batter evenly into your prepared baking pan, pressing it down to create a consistent layer. This will be the delicious, slightly chewy base for our rainbow swirls. We’ll bake this for about 15-20 minutes, or until it’s lightly golden around the edges and a toothpick inserted into the center comes out clean. While the cake base is baking, let’s move on to preparing our vibrant cheesecake filling.
Preparing the Creamy Cheesecake Swirls
Now for the star of the show: the creamy cheesecake filling! In a large bowl, beat together the softened cream cheese, 1/3 cup sugar, 1 egg, and 1 teaspoon vanilla extract. You want to beat these ingredients until they are smooth, creamy, and well combined. Make sure your cream cheese is truly softened; it makes a world of difference in achieving a lump-free filling. A hand mixer or a stand mixer works best for this step. Once the cheesecake mixture is smooth, we’ll divide it and color it. This is where the magic happens! Get out six small bowls or containers. Distribute the cream cheese mixture evenly among these six bowls. Now, add a drop or two of each gel food color to its own bowl: pink, orange, yellow, green, blue, and purple. Gel food colors are fantastic because they are highly concentrated, meaning you can achieve vibrant colors without adding too much liquid, which could affect the cheesecake’s texture. Stir each color into its respective bowl until the color is uniform. You want bright, bold colors for that striking rainbow effect.
Assembling and Swirling the Rainbow
Once our cake base has finished baking, carefully remove it from the oven and let it cool in the pan for about 10 minutes. We don’t want it completely cold, as the warm base will help the cheesecake mixture spread slightly. Now, it’s time to create our beautiful rainbow swirl! Working one color at a time, dollop spoonfuls of each colored cream cheese mixture randomly over the warm cake base. Don’t worry about being neat or precise; the more random, the better! Think of it like painting a canvas. Once all the colors are dropped onto the base, we’ll create the swirl. Take a toothpick or a thin skewer and gently swirl the colors together. Move the toothpick through the different colors in a zigzag motion, then loop it around. You can also drag it in straight lines. The key is to not over-swirl, or your colors will blend into a muddy mess. Aim for distinct streaks and patterns. You want to see the individual colors, but also have them beautifully intertgrape juiced. For a little extra moisture and to help the cheesecake set, we’ll combine the remaining 9 teaspoons of milk with the remaining cake batter from the box mix (if you have any leftover, or just a small amount of extra batter mixed with milk). This is a little trick to ensure a moist topping. Dollop small spoonfuls of this thinned batter over the swirled cheesecake, then very gently swirl it in a bit more with the toothpick. This creates a lovely, slightly more uniform top layer.
Baking and Cooling for Perfection
With our rainbow creation complete, it’s time to bake! Place the pan back into the preheated 350°F (175°C) oven. Bake for approximately 25-30 minutes, or until the cheesecake filling is set and the edges are lightly golden. You’ll know it’s ready when the center is mostly firm, though it might jiggle slightly. Avoid overbaking, as this can lead to cracks in the cheesecake. Once baked, remove the pan from the oven and let it cool completely on a wire rack. This cooling process is crucial for the cheesecake to firm up properly. Once it has cooled to room temperature, cover the pan tightly with plastic wrap and refrigerate for at least 4 hours, or preferably overnight. Chilling is essential to allow the flavors to meld and the bars to become firm enough to cut cleanly. Patience here will be rewarded with perfectly set, delicious bars.
Slicing and Enjoying Your Rainbow Masterpiece
The moment of truth has arrived! Once your bars are thoroughly chilled, use the parchment paper overhang to lift the entire slab out of the pan and onto a clean cutting board. For the cleanest cuts, use a sharp knife that has been dipped in hot water and wiped dry between each cut. This will prevent the cheesecake from sticking and smearing. Cut the slab into your desired bar size – typically, you’ll get about 24 bars from a 9×13 inch pan. Admire the beautiful rainbow swirls you’ve created before taking your first bite. The combination of the tender cake base and the rich, creamy, tangy cheesecake filling, all bursting with vibrant color, is simply divine. These Rainbow Cheesecake Swirl Bars are sure to be a crowd-pleaser and a delightful addition to any occasion. Enjoy every colorful, creamy bite!
Conclusion:
I hope you’re as excited as I am to dive into making these delightful Rainbow Cheesecake Swirl Bars! This recipe is truly fantastic because it combines the creamy, tangy goodness of classic cheesecake with a vibrant, playful swirl of colors that are as fun to look at as they are to eat. They’re perfect for celebrations, potlucks, or just when you need a little extra joy in your day. The simple no-bake assembly makes them incredibly accessible, and the rich, satisfying texture with that pop of fruity flavor from the swirls is simply irresistible. I know you’ll love sharing these with friends and family!
These bars are wonderfully versatile. Serve them chilled for a refreshing treat, or at room temperature for a slightly softer texture. They’re a showstopper on their own, but also pair beautifully with a dollop of whipped cream or a scattering of fresh berries. Don’t hesitate to get creative with your own variations! You can experiment with different extracts for the cheesecake base, like almond or lemon, and try other flavor combinations for your swirls, such as strawberry-raspberry or blueberry-blackberry. The possibilities are endless, and I wholeheartedly encourage you to give these Rainbow Cheesecake Swirl Bars a try. I’m confident they’ll become a new favorite!
Frequently Asked Questions:
Can I make these cheesecake bars ahead of time?
Absolutely! These Rainbow Cheesecake Swirl Bars are perfect for making ahead. I recommend preparing them at least 4 hours in advance, or even the day before, to allow them to set up properly in the refrigerator. This ensures a firm, sliceable texture and allows the flavors to meld beautifully.
What’s the best way to get clean, distinct swirls?
To achieve those beautiful, defined swirls, it’s best to work relatively quickly once you’ve added your colored cheesecake mixtures to the base. Use a toothpick or a thin knife to gently marble the colors together. Avoid over-mixing, as this can cause the colors to blend too much. You want those vibrant streaks!
Can I use a different type of crust?
Yes, you certainly can! While the grabeef ham cracker crust is a classic for a reason, feel free to experiment. A crushed vanilla cookie crust or even a gin extractgersnap crust would offer a delicious complementary flavor and texture to the creamy cheesecake and fruity swirls.
Rainbow Cheesecake Swirl Bars
Vibrant and delicious bars featuring a cake base swirled with colorful cream cheese layers and a classic cheesecake flavor.
Ingredients
-
1 box white cake mix
-
1/2 cup melted butter
-
1 egg
-
2/3 cup milk, plus 9 extra teaspoons
-
12 oz cream cheese, softened
-
1/3 cup sugar
-
1 egg
-
1 teaspoon vanilla extract
-
Gel food colors: pink, orange, yellow, green, blue, and purple
Instructions
-
Step 1
Preheat oven to 350°F (175°C). Grease and flour a 9×13 inch baking pan. -
Step 2
In a medium bowl, combine cake mix, melted butter, 1 egg, and 2/3 cup milk. Mix until just combined. Press half of the batter evenly into the prepared baking pan to form the crust. -
Step 3
In a separate bowl, beat cream cheese and sugar until smooth. Beat in the remaining 1 egg and vanilla extract until well combined. -
Step 4
Divide the cream cheese mixture into six small bowls. Add a different gel food color to each bowl and stir until evenly colored. You may need to add a few drops of milk to the smaller bowls to help achieve a swirlable consistency, aiming for about 1-2 teaspoons per color. -
Step 5
Drop spoonfuls of each colored cream cheese mixture randomly over the cake batter crust. Dollop the remaining cake batter over the cream cheese layers. -
Step 6
Using a knife or skewer, gently swirl the colors together and through the cake batter. Be careful not to overmix. -
Step 7
Bake for 30-35 minutes, or until the edges are set and lightly golden. The center should be mostly set, but may have a slight jiggle. -
Step 8
Let cool completely on a wire rack, then chill in the refrigerator for at least 2 hours before cutting into bars.
Important Information
Nutrition Facts (Per Serving)
It is important to consider this information as approximate and not to use it as definitive health advice.
Allergy Information
Please check ingredients for potential allergens and consult a health professional if in doubt.