Easter Bunny Coconut Tails-Sweet Treats
Easter Bunny Coconut Tails are the whimsical, sweet treat that will have everyone hopping with delight this spring! There’s something inherently joyful about these little bundles of coconut goodness, don’t you think? They perfectly capture the playful spirit of Easter, making them an absolute must-have for any celebration. What I love most about Easter Bunny Coconut Tails is their delightful texture – that satisfying chew of shredded coconut coated in creamy white chocolate, all shaped into adorable bunny tails. They’re incredibly simple to make, yet they have such a charming presentation that makes them feel incredibly special. Forget the store-bought versions; these homemade delights are guaranteed to be the star of your dessert table. Get ready to create a little magic in your kitchen with these irresistible Easter Bunny Coconut Tails!
Easter Bunny Coconut Tails
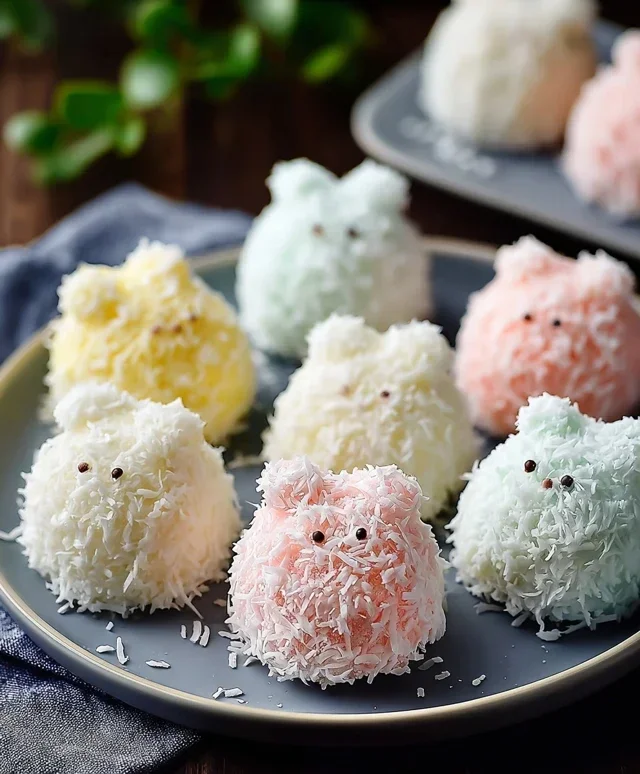
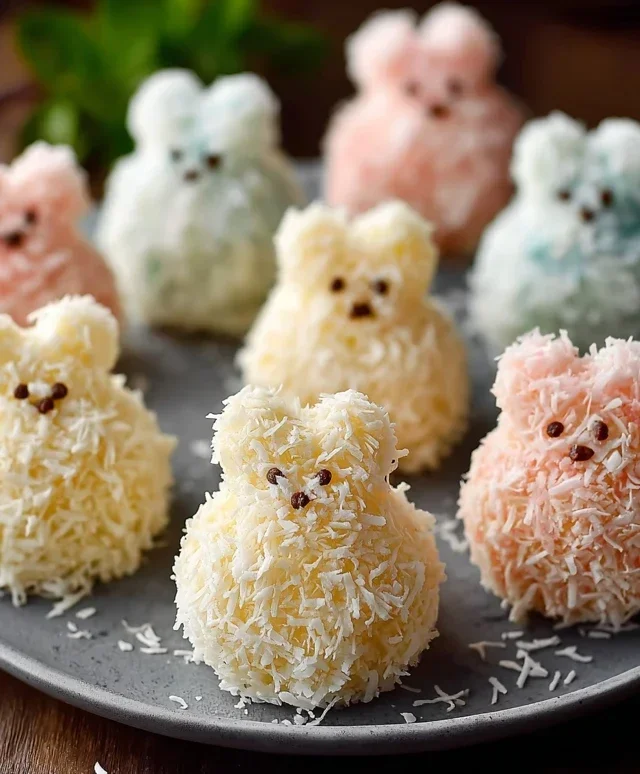
These adorable Easter Bunny Coconut Tails are a delightful and surprisingly simple treat to make for your springtime celebrations! They’re a fantastic way to bring a touch of whimsy to your Easter dessert table and are sure to bring smiles to faces of all ages. Imagin extracte a fluffy, sweet coconut cloud shaped like a bunny tail, dipped in creamy white chocolate and adorned with a touch of pink. They’re almost too cute to eat… almost! This recipe is perfect for getting the whole family involved in the kitchen, and the results are wonderfully rewarding. Let’s get started on creating these charming Easter delights!
Ingredients:
Creating the Coconut Base
The first step in crafting these delightful bunny tails is to create our fluffy coconut base. This part is incredibly easy and relies on the magic of melting marshmallows. In a medium-sized, microwave-safe bowl, combine the 1½ cups of mini marshmallows and the ¼ cup of butter. It’s important to use mini marshmallows because they melt more evenly and quickly, creating a smoother binder for our coconut. Place the bowl in the microwave and heat in 30-second intervals, stirring well after each interval, until the marshmallows are completely melted and smooth. This usually takes about 1 to 1.5 minutes in total, depending on your microwave’s wattage. Be careful not to overheat, as this can make the mixture tough. Once smooth and melted, carefully remove the bowl from the microwave.
Now, it’s time to add the flavor and the star of our base: the coconut! Stir the 1 teaspoon of vanilla extract into the melted marshmallow and butter mixture. The vanilla extract adds a lovely depth of flavor that complements the sweetness of the marshmallows and the subtle nuttiness of the coconut beautifully. Next, gradually add the 2 cups of shredded coconut to the bowl. I like to add it a little at a time, stirring continuously, to ensure it’s all evenly coated with the marshmallow mixture. You want to work quickly here, as the marshmallow mixture will start to set as it cools. Keep stirring until all the coconut is well incorporated and you have a sticky, clumpy mass. This mixture will be quite sticky, so don’t be alarmed – that’s exactly what we want!
Shaping the Tails
With our coconut mixture ready, it’s time to get our hands a little sticky and shape these into adorable bunny tails. Lightly grease your hands with a bit of non-stick cooking spray or a tiny bit of butter. This will prevent the sticky coconut mixture from clingin extractg to your skin. Scoop out about a tablespoon of the coconut mixture at a time. Roll it gently between your palms to form a round, ball shape, resembling a plump bunny tail. Don’t worry if they aren’t perfectly uniform; a little rustic charm adds to their handmade appeal. You can make them as big or as small as you like, but a size of about 1.5 inches in diameter works perfectly. As you shape them, place them onto a baking sheet lined with parchment paper or wax paper. This lining is crucial because it will prevent the tails from sticking to the baking sheet as they set. Continue shaping until all the coconut mixture has been used. You should get a good batch of these fluffy tails from this recipe.
Once all the coconut tails are shaped and on the prepared baking sheet, you’ll want to let them set and firm up a bit. You can leave them at room temperature for about 30 minutes to an hour, or for a quicker set, place the baking sheet in the refrigerator for about 15-20 minutes. This chilling period will help them hold their shape better when we move on to the coating stage. While they are chilling, you can start preparing for the next step.
The White Chocolate Dip and Decoration
Now for the finishing touch that makes these Easter Bunny Coconut Tails truly special: the white chocolate coating and a hint of pink! In a microwave-safe bowl, combine the 1 cup of white chocolate chips. Microwave in 30-second intervals, stirring thoroughly between each interval, until the white chocolate is completely melted and smooth. White chocolate can be a bit trickier to melt than milk or dark chocolate, so it’s important to stir frequently and avoid overheating, which can cause it to seize. Once melted and glossy, you’re ready to dip.
Gently take each coconut tail from the baking sheet. Using a fork or a toothpick, dip each tail into the melted white chocolate, coating it completely. Let any excess chocolate drip back into the bowl. This technique ensures a nice, even coating without too much thickness. Place the dipped tails back onto the parchment-lined baking sheet. Repeat this process for all the coconut tails. If the white chocolate starts to thicken as you work, you can pop it back in the microwave for a very short burst (10-15 seconds) to loosen it up.
For the final decorative touch, we’ll add a little pink! Melt a small amount of the pink candy melts according to their package directions. This usually involves microwaving them in short intervals, stirring well each time. Once melted, transfer the pink candy melts into a small piping bag or a zip-top bag with a tiny corner snipped off. Once the white chocolate coating on the coconut tails has set slightly but is not fully hardened, pipe a few small dots of pink candy melt onto each tail to resemble a subtle blush, like the inside of a bunny’s ear or a little bit of rosy cheek. This adds that perfect Easter charm! Alternatively, you can use a toothpick to gently swirl a tiny bit of pink onto the tails.
Setting and Enjoying
After dipping and decorating, allow the Easter Bunny Coconut Tails to set completely. You can leave them at room temperature until the chocolate is firm, which usually takes about an hour, or speed up the process by placing them in the refrigerator for about 15-20 minutes. Once set, they are ready to be admired and, more importantly, devoured! These are best enjoyed within a few days of making them. Store them in an airtight container at room temperature. If you live in a warm climate, you might want to store them in the refrigerator to prevent the chocolate from melting. Enjoy these delightful, homemade Easter treats with your loved ones!
Conclusion:
These Easter Bunny Coconut Tails are an absolutely delightful treat that brings a touch of whimsical charm to your holiday celebrations! They’re wonderfully simple to make, making them a perfect activity for families to enjoy together. The irresistible combination of tender, sweet coconut and a hint of vanilla, all coated in creamy white chocolate and adorned with playful bunny ears, guarantees smiles all around. Whether you’re looking for a festive dessert for your Easter brunch or a fun project to keep the kids entertained, this recipe delivers pure joy. I genuinely encourage you to give these Easter Bunny Coconut Tails a try – they are sure to become a beloved tradition!
For serving, these adorable tails are fantastic on their own as a sweet indulgence. They also make a charming addition to an Easter dessert platter, alongside cakes and cookies. You could even package them in small cellophane bags tied with ribbon as delightful party favors or thoughtful edible gifts for friends and family.
Looking for variations? Feel free to experiment with different types of chocolate for dipping, such as milk or dark chocolate. You could also add a touch of edible glitter for extra sparkle or even color the coconut with pastel food dyes before shaping. The possibilities are endless for making these Easter Bunny Coconut Tails uniquely yours!
Frequently Asked Questions:
Can I make these ahead of time?
Absolutely! These Easter Bunny Coconut Tails can be made a day or two in advance and stored in an airtight container at room temperature. This is a great way to get a head start on your holiday baking!
What if I don’t have white chocolate?
No problem! If you don’t have white chocolate, you can substitute it with other melting chocolates like milk or dark chocolate. For a dairy-free option, look for dairy-free white chocolate chips.
How should I store leftovers?
Store any leftover Easter Bunny Coconut Tails in an airtight container at cool room temperature for up to 3 days. Avoid refrigerating them, as this can cause the chocolate to bloom and become dull.
Easter Bunny Coconut Tails
Sweet and simple no-bake treats shaped like bunny tails, perfect for Easter.
Ingredients
-
2 cups shredded coconut
-
1½ cups mini marshmallows
-
¼ cup butter
-
1 teaspoon vanilla extract
-
1 cup white chocolate chips
-
Pink candy melts for decoration
Instructions
-
Step 1
In a microwave-safe bowl, combine mini marshmallows and butter. Microwave in 30-second intervals, stirring after each, until melted and smooth. -
Step 2
Stir in the vanilla extract until well combined. -
Step 3
Add the shredded coconut to the marshmallow mixture and mix until fully incorporated. -
Step 4
Shape the coconut mixture into small, oval “bunny tails.” Place on a parchment-lined baking sheet. -
Step 5
Melt the white chocolate chips according to package directions. Drizzle over the coconut tails. -
Step 6
Melt the pink candy melts according to package directions. Dip a toothpick or small spoon into the pink melts and create small “pink dots” on each coconut tail to resemble blush. -
Step 7
Allow the chocolate and candy melts to set completely before serving.
Important Information
Nutrition Facts (Per Serving)
It is important to consider this information as approximate and not to use it as definitive health advice.
Allergy Information
Please check ingredients for potential allergens and consult a health professional if in doubt.