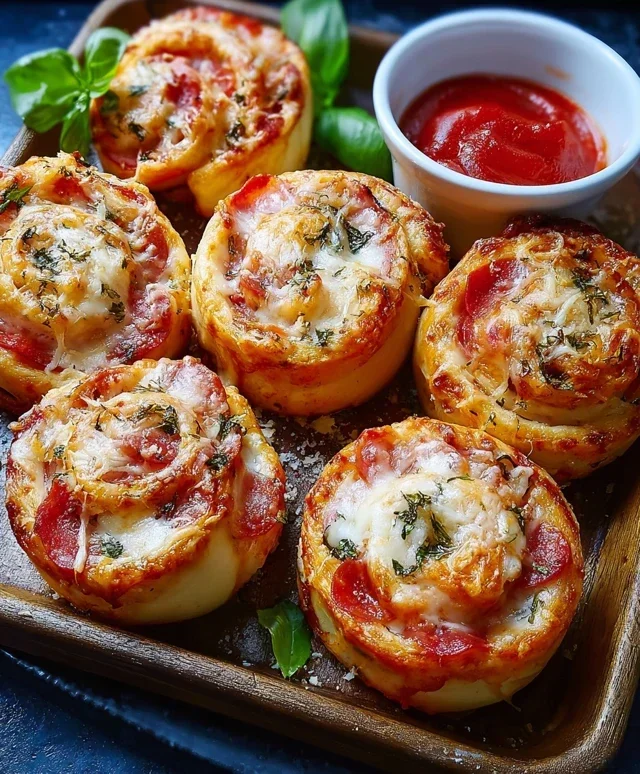
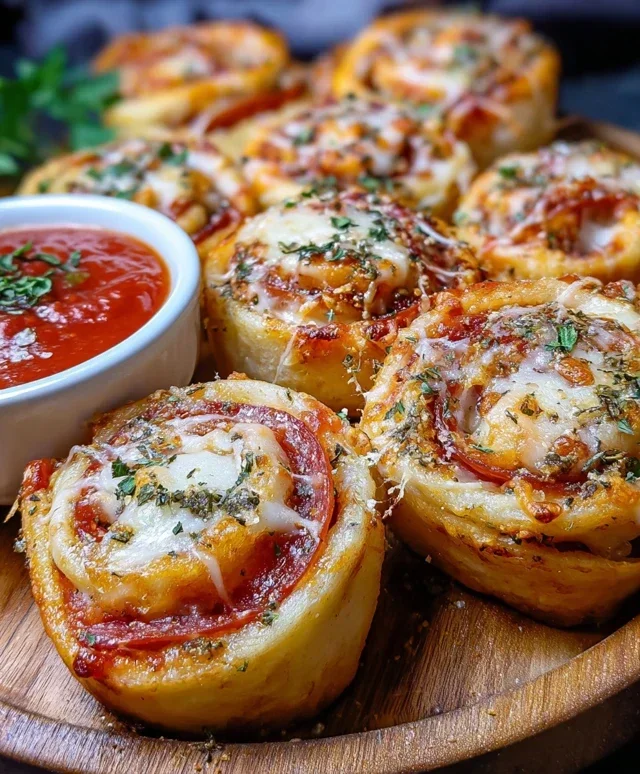
Easy Homemade Pizza Rolls Recipe – Delicious Fun
Pizza rolls are more than just a snack; they’re a nostalgic trip back to childhood sleepovers, Friday night movie marathons, and effortless party appetizers. There’s something undeniably magical about those warm, cheesy pockets of deliciousness, aren’t there? We all remember the sheer joy of unboxing a package of frozen pizza rolls, eagerly waiting for that perfect, golden-brown crisp. But what if I told you that making homemade pizza rolls from scratch is not only achievable but also elevates this beloved treat to an entirely new level of amazing? Forget the freezer aisle; we’re talking about fresh, customizable, and unbelievably satisfying pizza rolls that will have everyone beggin extractg for the recipe. Get ready to impress yourself and your loved ones with these flavor-packed bites!
Why You’ll Love This Recipe:
This recipe is designed for ultimate flavor and fun. We’re talking about a perfect balance of chewy dough, gooey cheese, and your favorite pizza toppings, all baked to crispy perfection. They’re incredibly versatile – whether you’re craving a classic beef pepperoni or something a little more adventurous, these pizza rolls are your canvas.
The Magic of Homemade Pizza Rolls:
What makes them so special? It’s the homemade touch. You control the ingredients, the spice level, and the sheer volume of cheese! Plus, the aroma of them baking in your own oven? Absolutely divine. Prepare to fall in love with pizza rolls all over again.
Pizza Rolls
Get ready to impress yourself and everyone around you with these incredibly delicious and surprisingly simple homemade pizza rolls! Forget the frozen aisle; these flavor-packed bites are bursting with your favorite pizza toppings, all wrapped up in a warm, doughy embrace. They’re perfect for game nights, movie marathons, or just when that pizza craving strikes. The best part? You can customize them with your favorite ingredients! Let’s get started on creating these irresistible treats.
Ingredients:
Preparing Your Toppings: The Foundation of Flavor
Before we dive into assembling our pizza rolls, let’s ensure all our ingredients are prepped and ready to go. This stage is crucial for a smooth assembly process and for distributing flavor evenly throughout each roll.
First, if you’re using a store-bought pizza dough ball, allow it to come to room temperature according to package directions. This makes it much easier to stretch and work with. If you’re using the refrigerated tube dough, simply unroll it.
Next, let’s talk about the vegetables. Finely dicing the mushrooms, onions, and bell peppers is key. You want them small enough to be incorporated easily into the roll without creating large, uneven pockets of raw vegetable. You can sauté these vegetables for a few minutes before adding them to the rolls if you prefer a softer texture and a more developed flavor, but for a quicker recipe, using them raw is perfectly fine. If you do choose to sauté, drain any excess moisture before adding them to the dough.
For the beef pepperoni, if you’re using larger slices, you can chop them into smaller, bite-sized pieces. This ensures you get a good amount of beef pepperoni in every bite.
Now, let’s prepare the garlic and butter mixture that will add an irresistible savory crust. In a small bowl, combine the melted salted butter with the minced garlic. If you’re using parsley, stir it into the butter and garlic mixture now. This aromatic butter will be brushed over the top of the rolled-up dough before baking, infusing it with fantastic flavor and creating a beautiful golden-brown finish.
Assembling the Pizza Rolls: The Art of the Roll
This is where the magic happens! We’ll take our prepared dough and transform it into a canvas for all our delicious fillings.
1. Roll out the dough: If you’re using the refrigerated tube dough, unroll it carefully onto a lightly floured surface. You’ll likely have a rectangular shape. If you’re using a dough ball, gently stretch or roll it out into a rectangle, aiming for a thickness of about ¼ inch. Don’t worry if it’s not perfectly uniform; rustic charm is part of the appeal! If the dough springs back too much, let it rest for 5-10 minutes before continuing.
2. Spread the sauce and cheese: Evenly spread about ¾ cup of your pizza sauce or marinara sauce over the dough, leaving about a ½-inch border along one of the longer edges. This border will act as a seal to prevent your fillings from escaping during baking. Then, sprinkle the shredded mozzarella cheese evenly over the sauce.
3. Layer on the toppings: Now, it’s time to add our chopped beef pepperoni, diced mushrooms, onions, and bell peppers. Distribute these toppings evenly over the cheese. Try not to overload the dough, as this can make it difficult to roll tightly and can cause the rolls to burst during baking. A good, even distribution is key to getting a bit of everything in each bite.
4. Roll it up tightly: Starting from the longer edge opposite the sauce-free border, begin extract to tightly roll up the dough, like a jelly roll. As you roll, gently press down to help seal the dough and ensure your fillings stay in place. You want to aim for a compact cylinder. Once you reach the end, pinch the seam firmly to seal it. This is your pizza roll log!
5. Slice and bake: Using a sharp knife, slice the pizza roll log into individual rolls, about 1 to 1 ½ inches thick. Place the sliced rolls, cut-side down, onto a baking sheet lined with parchment paper or lightly greased. Make sure there’s a little space between each roll as they will expand slightly as they bake.
Baking to Golden Perfection
The final stage is all about transforming our raw rolls into hot, gooey, and incredibly satisfying pizza bites.
Preheat your oven to 375°F (190°C).
Once the rolls are on the baking sheet, generously brush the tops and sides of each roll with the melted garlic butter mixture. This step is crucial for achieving that delicious, savory crust and a beautiful golden-brown color. Don’t be shy with the butter!
Bake for 15-20 minutes, or until the pizza rolls are golden brown and the cheese is melted and bubbly. The exact baking time will depend on your oven and the thickness of your rolls. Keep an eye on them during the last few minutes of baking to prevent burning.
Once baked to perfection, remove the pizza rolls from the oven. If you’d like, you can sprinkle a little extra Parmesan cheese over the top while they’re still hot for an extra burst of cheesy goodness.
Let the pizza rolls cool for a few minutes before serving. They will be very hot! Serve them warm with extra pizza sauce or marinara for dipping. Enjoy your homemade pizza rolls – you’ve earned it!
Conclusion:
And there you have it! This pizza roll recipe is a game-changer for anyone craving that classic pizza flavor in a fun, bite-sized package. It’s incredibly versatile, surprisingly easy to whip up, and guaranteed to be a hit with both kids and adults. The beauty of these pizza rolls lies in their adaptability; you can customize every aspect to your heart’s content. Whether you’re looking for a quick weeknight dinner, a crowd-pleasing appetizer, or a fun activity to do with the family, these rolls deliver. Don’t be afraid to experiment with your favorite pizza toppings – the possibilities are truly endless! I wholeheartedly encourage you to give this recipe a try; you won’t be disappointed by the delicious results.
For serving, these pizza rolls are fantastic on their own, but they also pair wonderfully with a marinara dipping sauce, ranch dressing, or even a garlic butter sauce. Think of them as the perfect companion for movie nights, game days, or potlucks. For variations, consider adding cooked Italian sausage, beef pepperoni, mushrooms, olives, or even some finely chopped bell peppers and onions. For a vegetarian twist, try a white pizza version with ricotta and spinach.
Frequently Asked Questions:
Can I make the pizza rolls ahead of time?
Absolutely! You can assemble the pizza rolls up to a day in advance and store them, covered, in the refrigerator. Bake them as directed, adding a few extra minutes to the baking time if they are coming straight from the fridge.
What’s the best way to reheat leftover pizza rolls?
For the crispiest results, I recommend reheating them in a single layer on a baking sheet in a preheated oven at around 350°F (175°C) for 5-10 minutes, or until warmed through. Microwaving can make them a bit soft.
Can I freeze the pizza rolls?
Yes, you can! Assemble the pizza rolls and place them on a baking sheet in the freezer until firm. Once frozen, transfer them to a freezer-safe bag or container. Bake from frozen, adding about 5-10 minutes to the baking time, until golden brown and heated through.
Pizza Rolls
Homemade pizza rolls made with store-bought dough, pepperoni, cheese, and a medley of vegetables, baked until golden and served with extra pizza sauce for dipping.
Ingredients
-
1 tube Pillsbury pizza dough or store-bought pizza dough ball
-
1 ½ cups beef pepperoni slices
-
1 ½ cups mozzarella cheese, shredded
-
1 cup pizza sauce
-
½ cup mushrooms, finely diced
-
½ cup onions, finely diced
-
½ cup bell peppers, finely diced
-
¼ cup salted butter, melted
-
1 clove garlic, minced
-
1 teaspoon parsley, dried
-
Pizza sauce, for dipping
-
Parmesan cheese, for garnish
Instructions
-
Step 1
Preheat oven to 400°F (200°C). Line a baking sheet with parchment paper. -
Step 2
Unroll the pizza dough onto a lightly floured surface. Spread the pizza sauce evenly over the dough, leaving a small border. -
Step 3
Sprinkle the mozzarella cheese, pepperoni slices, mushrooms, onions, and bell peppers over the sauce. -
Step 4
Carefully roll up the dough tightly, starting from one long edge. Pinch the seam to seal. -
Step 5
Slice the roll into 1-inch thick pieces. Place the rolls cut-side up on the prepared baking sheet. -
Step 6
In a small bowl, whisk together the melted butter, minced garlic, and dried parsley. Brush this mixture over the tops of the pizza rolls. -
Step 7
Bake for 15-20 minutes, or until golden brown and the cheese is melted and bubbly. -
Step 8
Serve immediately with extra pizza sauce for dipping and a sprinkle of Parmesan cheese, if desired.
Important Information
Nutrition Facts (Per Serving)
It is important to consider this information as approximate and not to use it as definitive health advice.
Allergy Information
Please check ingredients for potential allergens and consult a health professional if in doubt.