Easter Jello-O Pie Recipe – Easy & Refreshing Dessert
Easter Jello-O pie is more than just a dessert; it’s a nostalgic trip back to childhood Easters, a vibrant centerpiece that sparks joy, and a guaranteed crowd-pleaser for gatherings of all sizes. We all have those classic recipes that hold a special place in our hearts, and for many of us, this shimmering, jiggly delight is at the top of that list. There’s something undeniably whimsical about the way it wobbles and the burst of fruity flavor it delivers. It’s the perfect blend of playful and delicious, making it an absolute must-have for your Easter celebration. Its simplicity belies its charm, and its bright colors are sure to add a festive touch to any table.
Why You’ll Love This Easter Jello-O Pie
A Taste of Tradition and Pure Fun
This particular Easter Jello-O pie recipe takes that beloved classic and elevates it just a touch, ensuring it’s as delightful to make as it is to devour. It’s the kind of dessert that brings smiles to faces, young and old, and evokes memories of Easters past. The magic lies in its effortless preparation and its overwhelmingly cheerful presentation. Get ready to create a dessert that’s as beautiful as it is delicious, embodying the very spirit of the holiday.
Easter Jello-O Pie
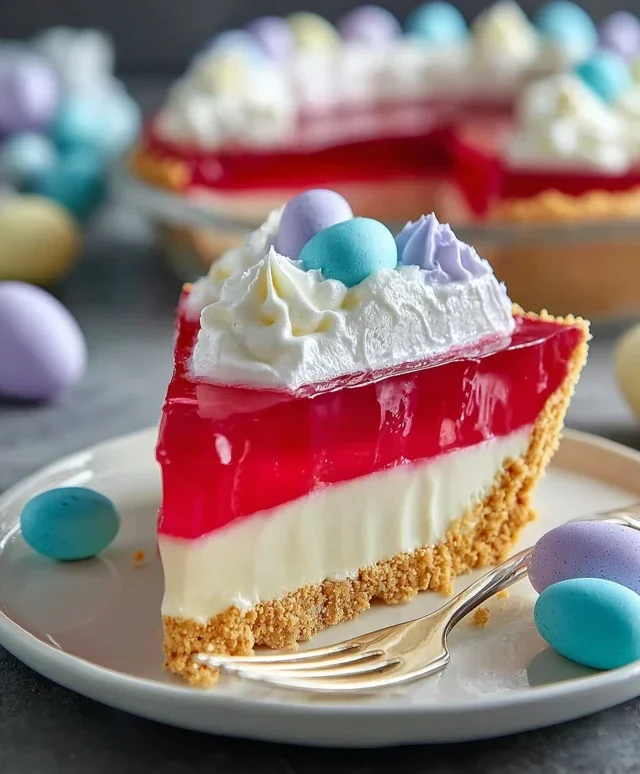
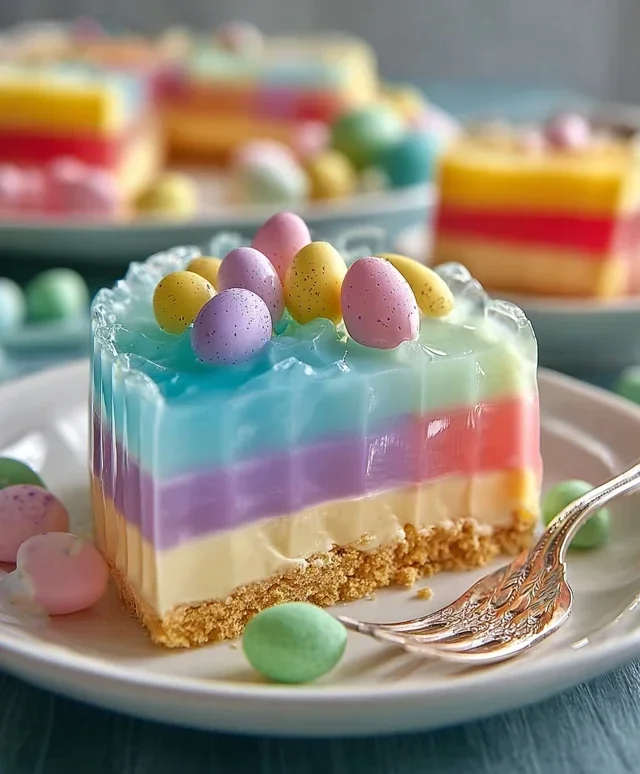
This Easter Jello-O Pie is a delightful, visually stunning dessert that’s perfect for your spring celebrations. It’s surprisingly easy to make and the vibrant colors are sure to bring smiles to everyone’s faces, especially the kids! We’re going to create a beautiful layered effect using classic Jell-O flavors, nestled in a crunchy grabeef ham cracker crust, all topped with a cloud of whipped cream. It’s a retro treat with a festive twist that tastes as good as it looks. Get ready for a fun and flavorful baking (or rather, no-baking!) adventure.
Ingredients:
Crust Preparation
The foundation of our Easter Jello-O Pie is a simple yet delicious grabeef ham cracker crust. This provides a satisfying crunch that perfectly contrasts with the smooth, jiggly layers above.
1. Begin extract by preheating your oven to 350°F (175°C). While the oven heats up, prepare your pie plate. You’ll need a standard 9-inch pie plate.
2. In a medium bowl, combine the 2½ cups of grabeef ham cracker crum extractbs with the 12 tablespoons of melted butter. Make sure the butter is thoroughly melted before adding it to the crum extractbs. Stir everything together until the crum extractbs are evenly moistened and resemble wet sand. This ensures the crust holds its shape when pressed.
3. Press the grabeef ham cracker mixture firmly into the bottom and up the sides of your pie plate. You can use the bottom of a glass or a measuring cup to help create a firm, even layer. Getting a good, compact crust is key to preventing it from crum extractbling when you slice the pie.
4. Bake the crust for 8-10 minutes, or until it’s lightly golden and fragrant. This baking step helps to set the crust and adds an extra layer of crispness. Once baked, remove it from the oven and let it cool completely on a wire rack. This cooling time is crucial before you start adding the Jell-O layers, otherwise, the heat from the crust could melt the Jell-O.
Jell-O Layering
This is where the magic happens! We’ll be creating distinct, colorful layers, and the key is to work with cooled, but not yet set, Jell-O.
1. Divide the 3 cups of boiling water equally among the four different Jell-O flavors. This means you’ll have ¾ cup of boiling water for each package of Jell-O. Stir each flavor thoroughly until the powder is completely dissolved. This is important for smooth, lump-free Jell-O.
2. Now, divide the 1⅓ cup of cold water. You’ll need about 1/3 cup of cold water for each Jell-O mixture. Add the cold water to each bowl of dissolved Jell-O and stir again. At this stage, you can also add a drop or two of food coloring if you want to enhance the vibrancy of your colors, especially for the pink and yellow Jell-O if they seem a little pnon-alcoholic ale. Remember, a little goes a long way with food coloring.
3. This is a crucial step for achieving distinct layers: you need to let the Jell-O mixtures cool down to room temperature. This will take some patience, but it’s essential. If you pour warm Jell-O onto another layer, they will likely mix together, and you won’t get those beautiful distinct lines. You can speed this up slightly by placing the bowls in the refrigerator for about 20-30 minutes, stirring occasionally, but do not let them start to set. They should be cool to the touch but still liquid.
4. Once the crust is completely cool and the Jell-O mixtures are at room temperature, you can begin extract layering. Start with one color – let’s begin extract with the purple. Carefully pour the purple Jell-O into the cooled grabeef ham cracker crust. Place the pie in the refrigerator and let this layer chill until it is just begin extractning to set. This means it should be slightly thickened, like egg whites, but not fully firm. This will typically take about 30-45 minutes. This partial setting is what allows the next layer to sit on top without sinking.
5. Repeat the chilling and layering process for the remaining colors: yellow, then blue, and finally the pink. For each subsequent layer, ensure the previous layer is at that slightly set stage before gently pouring the next color. After you pour the final pink layer, return the entire pie to the refrigerator and chill for at least 2-3 hours, or until all the Jell-O layers are completely firm and set.
Whipped Cream Topping
The final touch to our Easter Jello-O Pie is a generous topping of whipped cream, adding a creamy richness that perfectly complements the sweet, fruity Jell-O.
1. In a large, chilled bowl, combine the remaining whipped cream (you’ll have used some for the layers if you chose to incorporate it there, or if you’re using pre-made whipped topping, ensure you have enough for a good topping) with the reserved portion of whipped cream (if any, depending on whether you folded some into the Jell-O layers. If you’re using a store-bought stabilized whipped topping, this step is simpler. If you’re whipping your own heavy cream, make sure it’s very cold).
2. Using an electric mixer on medium-high speed, whip the cream until stiff peaks form. This means when you lift the beaters, the cream stands up straight and doesn’t flop over. Be careful not to over-whip, or you’ll end up with butter!
3. Once the Jell-O layers are completely set, spread the whipped cream evenly over the top of the pie. You can make decorative swirls with a spatula or use a piping bag for a fancier finish.
4. For an extra festive touch, you can add some Easter-themed sprinkles on top of the whipped cream before serving.
5. Keep the pie refrigerated until ready to serve. Enjoy this delightful, colorful, and refreshing Easter treat!
Conclusion:
I hope you’re as excited to make this Easter Jello-O Pie as I am to share it with you! This recipe is a fantastic choice for your holiday celebrations because it’s incredibly easy to prepare, requires minimal active cooking time, and delivers a delightful, refreshing dessert that’s always a crowd-pleaser. The vibrant colors and light, fruity flavor make it a perfect sweet ending to any Easter brunch or dinner. Its simplicity means even begin extractner bakers can achieve impressive results, freeing up your time to focus on other festive preparations.
For serving, I love to present this Easter Jello-O Pie chilled, topped with a dollop of freshly whipped cream and a scattering of colorful sprinkles or even a few edible flowers for an extra special touch. It’s also wonderful served alongside fresh berries. If you’re feeling adventurous, consider trying variations! You could use different Jello flavors for a layered effect, incorporate some fresh fruit like chopped strawberries or pineapple into the Jello mixture before it sets, or even experiment with a grabeef ham cracker crust instead of a pre-made cookie crust. Don’t be afraid to make this recipe your own!
Give this Easter Jello-O Pie a try – I’m confident it will become a new family favorite. Happy baking and Happy Easter!
Frequently Asked Questions:
Can I make this pie ahead of time?
Absolutely! This Easter Jello-O Pie is perfect for making ahead. In fact, it needs several hours to set properly in the refrigerator. I usually make mine the day before to ensure it’s perfectly firm and chilled for serving. Just keep it covered in the fridge until you’re ready to enjoy it.
What’s the best way to get the pie out of the pan cleanly?
To ensure a clean release, make sure the Jello is fully set. If you’re using a pie plate with a removable bottom, this makes it very easy. For a standard pie plate, gently run a thin, sharp knife around the edge of the pie before attempting to unmold it onto a serving plate. Sometimes, a quick dip of the bottom of the pie plate in warm water for a few seconds can help loosen it, but be careful not to melt the Jello!
Easter Jell-O Pie
A colorful and festive Jell-O pie perfect for Easter celebrations, featuring a buttery graham cracker crust and layers of vibrant Jell-O and whipped cream.
Ingredients
-
2½ cups graham cracker crumbs
-
12 tbsp butter, melted
-
½ package Pink Starburst Jell-O (a little under 2 ounces)
-
1½ ounces Blue Jell-O (½ Package)
-
1½ ounces Yellow Jell-O (½ Package)
-
1½ ounces Purple Jell-O (½ Package)
-
3 cups boiling water, divided
-
1⅓ cup cold water, divided
-
16 ounces whipped cream, divided
-
Yellow food dye (optional)
-
Pink food dye (optional)
Instructions
-
Step 1
Preheat oven to 350°F (175°C). In a medium bowl, combine graham cracker crumbs and melted butter. Press mixture firmly into the bottom and up the sides of a 9-inch pie plate. -
Step 2
Bake the crust for 8-10 minutes. Let cool completely. -
Step 3
Prepare each Jell-O flavor separately. For each flavor, dissolve the Jell-O powder in 3/4 cup boiling water. Add 1/3 cup cold water and stir until completely dissolved. Add food coloring if desired for more vibrant colors. -
Step 4
Allow each Jell-O mixture to chill in the refrigerator until slightly thickened but not set (about 30-60 minutes). Stir in 4 ounces of whipped cream into each Jell-O mixture until well combined. -
Step 5
Pour the colored Jell-O and whipped cream mixtures into the cooled crust in alternating layers or sections to create a swirled effect. Chill in the refrigerator for at least 4 hours, or until firm. -
Step 6
Before serving, top with the remaining whipped cream.
Important Information
Nutrition Facts (Per Serving)
It is important to consider this information as approximate and not to use it as definitive health advice.
Allergy Information
Please check ingredients for potential allergens and consult a health professional if in doubt.