Mini Cannoli Cups-Easy Sweet Treat-Perfect Dessert
Mini Cannoli Cups are about to become your new favorite sweet treat, and for good reason! Who can resist the allure of those crisp, golden shells filled with a lusciously creamy, sweet ricotta filling? I know I can’t. There’s something undeniably magical about the contrast of textures and flavors – the satisfying crunch of the shell giving way to the smooth, decadent interior. These aren’t your average dessert; they’re miniature masterpieces, perfect for parties, special occasions, or simply when you crave a little taste of Italian sunshine. What makes these Mini Cannoli Cups so special is their perfectly portioned size, making them incredibly easy to enjoy without any mess, and the fact that they deliver all the iconic flavor of traditional cannoli in a delightful, bite-sized package. Get ready to impress yourself and everyone you share these with!
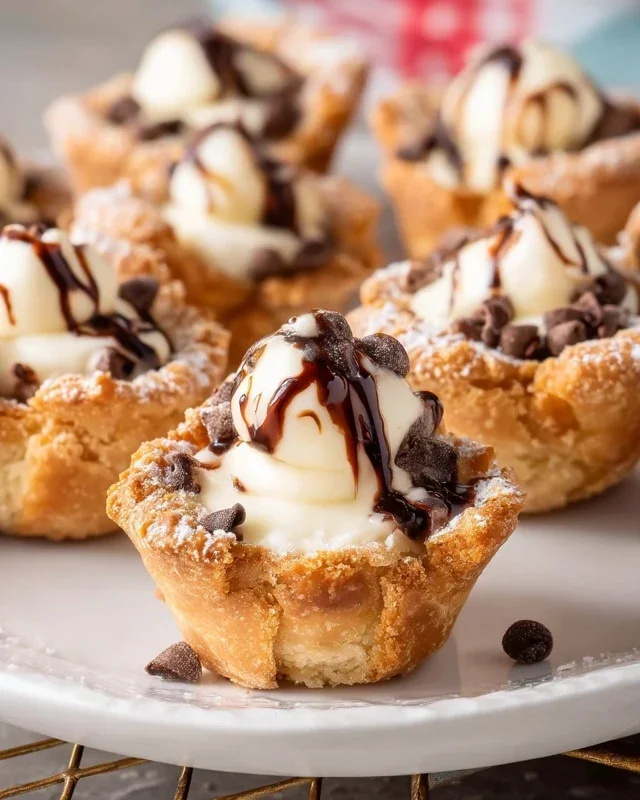
Mini Cannoli Cups
Are you craving that delightful crunch and creamy filling of cannoli, but intimidated by the thought of rolling and frying dough? I have the perfect solution for you: Mini Cannoli Cups! These adorable, bite-sized treats capture all the classic flavors of traditional cannoli without any of the fuss. Using readily available refrigerated pie crusts, we’ll create crispy, golden cups that are then filled with a luscious, sweet ricotta cream. They’re perfect for parties, a special dessert, or even just a delightful afternoon treat. Let’s get started on making these irresistible mini cannoli!
Ingredients:
Preparing the Ricotta Filling
The heart of any cannoli is its creamy filling, and ours is no exception. It’s incredibly simple to whip up and tastes wonderfully fresh.
Creating the Crispy Pie Crust Cups
This is where the magic happens and we transform humble pie crusts into perfect little cannoli shells.
Baking and Assembling Your Mini Cannoli Cups
The final steps to bringin extractg these delicious treats to life!
These Mini Cannoli Cups are a testament to how simple ingredients and a few clever shortcuts can lead to incredibly satisfying results. Enjoy every delightful bite!

Conclusion:
And there you have it – a delightful journey into creating these irresistible Mini Cannoli Cups! I truly hope you find this recipe as enjoyable to make as it is to devour. These little bites of heaven are perfect for any occasion, from casual get-togethers to more elegant dessert spreads. The satisfying crunch of the pastry shell, perfectly complemented by the creamy, sweet ricotta filling, makes for a truly memorable treat.
For serving, I love presenting them on a tiered stand, sprinkled with a dusting of powdered sugar or a few chocolate shavings. They’re also fantastic as part of a dessert buffet or simply served alongside coffee for an afternoon indulgence. Don’t be afraid to get creative with variations! Consider adding a splash of orange zest to the filling for a citrusy twist, or folding in mini chocolate chips for an extra layer of texture and flavor. You could even experiment with a dark chocolate drizzle over the top. I wholeheartedly encourage you to give this Mini Cannoli Cups recipe a try; I’m confident it will become a favorite in your baking repertoire!
Frequently Asked Questions:
Can I make the cannoli shells ahead of time?
Yes, you can definitely make the cannoli shells a day or two in advance. Store them in an airtight container at room temperature to maintain their crispiness. It’s best to fill them closer to serving time to prevent the shells from becoming soggy.
What if I don’t have mini cannoli forms?
No worries! You can improvise by cutting out circles from store-bought pie crusts or puff pastry. Shape them around a dowel or even a sturdy metal spoon handle while baking to achieve the classic tube shape. They might not be as perfectly uniform, but they’ll still taste amazing!
Can I use a different type of cheese for the filling?
While ricotta is traditional and yields the best flavor and texture, you could experiment with mascarpone for an even richer filling. However, avoid cream cheese as it has a tangier flavor and a different consistency that won’t be quite the same.
Mini Cannoli Cups
Adorable and easy-to-make mini cannoli cups featuring a creamy ricotta filling and a crisp, sweet crust, perfect for parties or a simple dessert treat. No frying required!
Ingredients
-
1 container whole-milk ricotta cheese (15 oz., drained)
-
1/2 cup powdered sugar
-
2 tablespoons granulated sugar
-
1 teaspoon finely grated orange or lemon zest
-
1/2 teaspoon vanilla extract
-
1 box refrigerated pie crusts, softened as directed on box (2 count )
-
3 tablespoons turbinado sugar (raw sugar)
-
1 teaspoon ground cinnamon
-
1/4 cup miniature semisweet chocolate chips or finely chopped pistachios
-
additional powdered sugar
Instructions
-
Step 1
Preheat oven to 375°F (190°C). Lightly grease a mini muffin tin. -
Step 2
In a medium bowl, combine the drained ricotta cheese, powdered sugar, granulated sugar, orange or lemon zest, and vanilla extract. Stir until smooth and well combined. -
Step 3
Unroll the refrigerated pie crusts. Using a 2.5-inch round cutter, cut out as many circles as possible. Press each circle gently into the cups of the prepared mini muffin tin, forming a shell. -
Step 4
Bake for 12-15 minutes, or until the crusts are golden brown and crisp. Let the crusts cool in the tin for a few minutes, then carefully remove them to a wire rack to cool completely. -
Step 5
In a small bowl, combine the turbinado sugar and ground cinnamon. Stir to combine. -
Step 6
Once the cannoli cups are completely cool, spoon or pipe the ricotta filling into each cup. Sprinkle the tops with the cinnamon-sugar mixture and the miniature chocolate chips or chopped pistachios. -
Step 7
Dust with additional powdered sugar just before serving, if desired.
Important Information
Nutrition Facts (Per Serving)
It is important to consider this information as approximate and not to use it as definitive health advice.
Allergy Information
Please check ingredients for potential allergens and consult a health professional if in doubt.