Delicious Recipe Ideas Easy to Make and Enjoy
Loading… is the ultimate comfort food, a dish that whispers warmth and satisfaction with every single bite. We all have those recipes that feel like a hug in a bowl, and for me, Loading… is undeniably it. It’s the kind of meal that brings people together, sparking conversations and creating memories around the dinner table. What is it about Loading… that captures our hearts and appetites? It’s the perfect harmony of textures and flavors, a delightful dance of savory goodness that’s both hearty and incredibly soulful. The beauty of this Loading… lies in its adaptability – while this version is a classic we adore, there’s always room to make it your own. Get ready to discover your new favorite weeknight savior, a recipe so good, it’ll have you coming back for seconds (and maybe even thirds!).
Loading…
Welcome to a truly unique and surprisingly delicious culinary adventure! Today, we’re diving into a recipe that’s less about traditional ingredients and more about the process of creation. Think of it as a foundation, a blank canvas waiting for your personal touch. This “Loading…” recipe is all about building something wonderful from the ground up, focusing on technique and a little bit of culinary intuition. It’s perfect for when you want to get creative in the kitchen, experiment with textures, and create something that feels entirely your own. We’re going to focus on preparing a foundational element that can then be customized endlessly. Get ready to impress yourself and anyone lucky enough to try your creation!
Ingredients:
Getting Started: The Foundation
Our journey begin extracts with combining the core components that will form the base of our dish. This stage is crucial for achieving the right texture and ensuring everything cooks evenly. Precision here will pay off in the final result.
Step-by-Step Instructions: Building the Base
1. Begin extract by placing your ground chicken in a medium-sized mixing bowl. Add the shredded cheese and the large egg to the bowl. It’s important to use fresh ingredients for the best flavor and binding. The cheese will not only add a wonderful richness but also contribute to a slightly crispy texture as it bakes. The egg acts as the binder, holding everything together beautifully.
2. Using your hands (the best tools for this job!), gently mix the ground chicken, cheese, and egg. The key here is to combine everything until it’s just incorporated. We want to avoid overworking the mixture. Overworking the ground chicken can break down the proteins too much, resulting in a tough and dense final product. You should see streaks of cheese and egg throughout the chicken, but no dry pockets of meat. Think of it as a gentle hug for your ingredients, not a vigorous kneading.
3. Once the mixture is well combined, it’s time to shape our base. Lightly grease a baking sheet or line it with parchment paper to prevent sticking. Spoon the chicken mixture onto the prepared baking sheet and begin extract to shape it into a round, much like a pizza crust. Aim for an even thickness throughout. This is incredibly important for even cooking. A thicker center will likely remain undercooked while the edges become overdone. Gently press and spread the mixture outwards from the center, ensuring the entire “crust” is of a consistent depth. About a 1/4 to 1/2 inch thickness is usually ideal.
4. Preheat your oven to 400 degrees Fahrenheit (200 degrees Celsius). Carefully place the shaped chicken base into the preheated oven. Now comes the part where we need to pay close attention. Baking time will vary depending on your oven and the thickness of your base, but typically, it will take between 20 to 25 minutes. Keep an eye on it as it bakes. You are looking for the edges to turn a beautiful golden brown and for the center to be cooked through. A slight browning on the edges indicates that it’s starting to crisp up nicely. Avoid letting it get too dark, as burnt edges can be bitter.
5. Once your chicken base has reached that perfect golden hue and appears cooked through, carefully remove it from the oven. This is a critical step for allowing the crust to firm up. Let it cool on the baking sheet for at least 5 to 10 minutes. This brief resting period allows the internal structure to set and the cheese to solidify a bit more, creating a sturdier base that won’t fall apart when you add your toppings. This cooling step is essential for a good texture.
The Finishing Touches (Your Creativity Unleashed!)
Now that you have this perfectly prepared, golden chicken crust, the real fun begin extracts! This is where you can let your culinary imagin extractation run wild. Think of it as your personal pizza base, but with a protein-packed twist. You can top it with your favorite pizza sauces (marinara, pesto, or even a creamy Alfredo), a generous amount of your preferred cheeses, and a medley of vegetables like bell peppers, onions, mushrooms, or olives. For a heartier meal, consider adding cooked meats like beef pepperoni or crum extractbled beef bacon. You can also explore other flavor profiles – imagin extracte it topped with a spicy buffalo chicken mixture or a savory BBQ chicken topping. The possibilities are truly endless, making this “Loading…” recipe a versatile foundation for countless delicious meals. Enjoy the process and the delicious outcome!
Conclusion:
Well, there you have it! This recipe for Loading… is an absolute winner in my kitchen, and I’m confident it will become a favorite in yours too. Its beauty lies in its incredible simplicity, yielding a surprisingly complex and satisfying flavor profile with minimal effort. Whether you’re a seasoned chef or just starting out, you’ll find this dish incredibly rewarding and adaptable.
I love serving this Loading… alongside a crisp, fresh salad for a delightful contrast in textures and temperatures. It also pairs wonderfully with a side of steamed vegetables or a fluffy grain like quinoa. For those looking to switch things up, consider adding a pinch of red pepper flakes for a hint of heat, or a squeeze of fresh lemon juice just before serving to brighten the flavors even further. Don’t be afraid to experiment with different herbs; fresh cilantro or parsley can add a wonderful herbaceous note.
I truly encourage you to give this recipe a try. It’s a fantastic example of how delicious and satisfying homemade meals can be, and it’s sure to impress your friends and family. Let me know how it turns out for you!
Frequently Asked Questions:
Can I make this recipe ahead of time?
Yes, you absolutely can! While best enjoyed fresh, the components of this Loading… recipe can often be prepared in advance. For example, you can chop your vegetables or prepare your sauce mixture a day ahead. Just be sure to store them separately and combine them closer to serving time to maintain the best texture and flavor.
What if I don’t have all the listed ingredients?
That’s the beauty of cooking! This recipe is quite forgiving. Feel free to substitute ingredients based on what you have on hand. For instance, if a specific vegetable isn’t available, try a similar one. The core essence of the dish should remain intact, allowing for enjoyable variations.
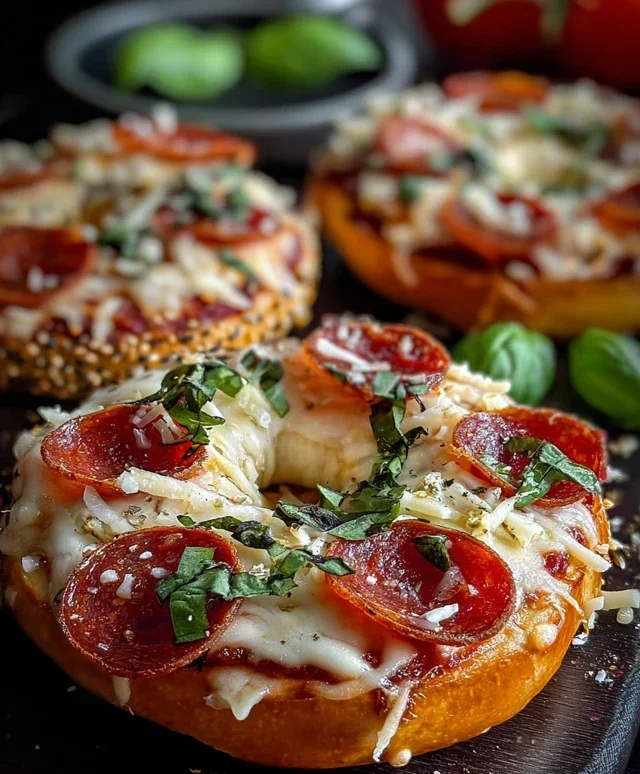
Chicken Pizza Crust
A simple and delicious chicken-based pizza crust that’s a healthier alternative to traditional dough. It’s seasoned and baked to a golden crisp.
Ingredients
-
1 pound ground chicken
-
1/2 cup shredded cheddar cheese
-
1 large egg
-
1/4 teaspoon salt
-
1/8 teaspoon black pepper
Instructions
-
Step 1
In a medium bowl, gently mix the ground chicken, shredded cheddar cheese, and egg until just combined. Be careful not to overwork the mixture, as this can make the crust tough. -
Step 2
Shape the chicken mixture into a pizza round on a baking sheet lined with parchment paper. Ensure the thickness is even throughout, as a thicker center will not cook as well. -
Step 3
Preheat your oven to 400°F (200°C). -
Step 4
Bake the chicken crust for 15-20 minutes, or until the edges are golden brown but not burnt. Keep a close eye on it during the final minutes of baking. -
Step 5
Remove the crust from the oven and let it cool slightly for about 5-10 minutes before adding your desired toppings. This cooling period helps the crust firm up.
Important Information
Nutrition Facts (Per Serving)
It is important to consider this information as approximate and not to use it as definitive health advice.
Allergy Information
Please check ingredients for potential allergens and consult a health professional if in doubt.