Easy Buster Bar Ice Cream Dessert Recipe
Buster Bar Ice Cream Dessert is more than just a frozen treat; it’s a nostalgic trip back in time, a symphony of textures and flavors that instantly brings smiles. If you’ve ever craved that perfect balance of creamy ice cream, rich chocolate, and a satisfying crunch, then you’re in for a real delight. This isn’t just any dessert; it’s an experience that transports you to carefree summer days and cozy evenings alike. What truly sets this Buster Bar Ice Cream Dessert apart is its incredible adaptability and the sheer joy it brings to any gathering, or even just a quiet moment for yourself. We’re talking about a dessert that’s deceptively simple to make but boasts a flavor profile that rivals any store-bought favorite. Get ready to fall in love with this iconic creation all over again, or perhaps for the very first time!
The Ultimate Buster Bar Ice Cream Dessert Recipe
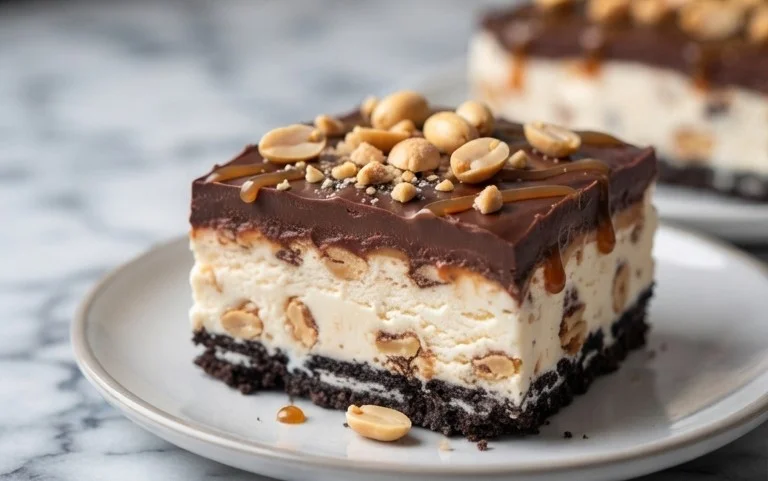
Get ready to impress your friends and family, or simply treat yourself to an unforgettable dessert experience! This Buster Bar Ice Cream Dessert is inspired by that beloved frozen treat, but with a homemade touch that makes it truly special. It’s a symphony of textures and flavors: a crisp, chocolatey cookie crust, creamy vanilla ice cream, a rich peanut and caramel-like layer, all enrobed in a decadent chocolate shell. Making this at home is surprisingly straightforward, and the results are absolutely worth it. Prepare for rave reviews!
Ingredients:
Preparing the Base: The Oreo Crust
The foundation of our Buster Bar dessert is a simple yet satisfying Oreo cookie crust. This step is all about creating that satisfying crunch that contrasts so beautifully with the creamy ice cream. To get started, take your entire package of Oreo cookies. You don’t need to be too precise with the crushing; a food processor works wonderfully for achieving a fine crum extractb, but you can also place the cookies in a sturdy zip-top bag and use a rolling pin to break them down. The goal is to have finely ground crum extractbs, with no large chunks remaining.
Once your Oreos are crushed, it’s time to bind them together. In a medium bowl, combine the Oreo crum extractbs with the 1/2 cup of melted butter. Stir everything together thoroughly until all the crum extractbs are moistened. This mixture should resemble wet sand. Now, grab an 8×8 inch baking dish or a similar sized pan. Press the Oreo mixture firmly and evenly into the bottom of the dish. You can use the back of a spoon or a flat-bottomed glass to ensure a compact and level surface. This firm crust will hold up to the ice cream and the subsequent layers. Pop this crust into the freezer for at least 15-20 minutes while you prepare the next component. This chilling step is crucial for making sure your crust stays in place and doesn’t mix with the ice cream.
Layering the Creaminess: Vanilla Ice Cream
Now comes the star of the show – the ice cream! You’ll want to start with a good quality vanilla ice cream and let it soften slightly at room temperature. This doesn’t mean letting it melt into a puddle; it should be pliable enough to spread easily but still firm enough to maintain its shape. Overly melted ice cream will make assembly messy and could lead to a less defined dessert.
Once your ice cream has reached the perfect softened consistency, carefully remove the chilled Oreo crust from the freezer. Spread the softened vanilla ice cream evenly over the Oreo crust, again using a spatula or the back of a spoon to create a smooth, even layer. Try to get the surface as flat as possible. Once the ice cream is spread, return the dish to the freezer. This layer needs to freeze solid, which will take at least 2-3 hours, but overnight is even better. Patience here is key to achieving those clean, distinct layers in your finished Buster Bar.
Crafting the Sweet & Salty Middle: The Peanut Layer
This next layer is what truly elevates our dessert, giving it that signature Buster Bar character. We’re creating a rich, almost caramel-like peanut mixture that is both sweet and satisfyingly salty from the Spanish peanuts. Begin extract by toasting your Spanish peanuts. While not strictly necessary, toasting them brings out their nutty flavor and adds an extra layer of deliciousness. You can do this in a dry skillet over medium heat for a few minutes, stirring constantly, or spread them on a baking sheet and toast them in a 350°F (175°C) oven for about 8-10 minutes, until fragrant. Let them cool slightly.
In a separate bowl, combine the 2 cups of powdered confectioner’s sugar and the 1 lb of Spanish peanuts. Now, you’ll want to introduce a binder. The melted butter and evaporated milk combination will create that luscious, slightly chewy texture. Take the 1/2 cup of butter (the second portion listed in the ingredients) and melt it. In a small saucepan, gently heat the 12 oz of evaporated milk until it’s warm, but not boiling. Slowly whisk the melted butter into the warm evaporated milk. This mixture will form the base for binding your peanut and sugar mixture.
Pour this warm butter and evaporated milk mixture over the powdered sugar and peanut mixture. Stir everything together until it forms a thick, paste-like consistency. It might seem a bit dry at first, but keep stirring and incorporating. The goal is to have a spreadable, cohesive layer. Once you’ve achieved a good consistency, it’s time to add this layer to our frozen dessert.
Assembling and Freezing the Layers
By now, your ice cream layer should be frozen solid. Take the dish out of the freezer. Carefully and evenly spread the peanut mixture over the frozen vanilla ice cream. Use a spatula to spread it as uniformly as possible, ensuring it covers the entire surface of the ice cream. You want a nice, even layer of that sweet and salty goodness. Once this peanut layer is in place, it’s time for another session in the freezer. This layer also needs to firm up. Return the dish to the freezer for at least another 1-2 hours. The firmer this layer is, the easier it will be to cut and the cleaner your final slices will be.
The Grand Finnon-alcoholic ale: The Chocolate Coating
This is the moment we’ve all been waiting for – the rich chocolate shell! This coating is what gives the Buster Bar its iconic look and irresistible finish. In a heatproof bowl set over a saucepan of simmering water (a double boiler method), combine the 12 oz of semi-sweet chocolate chips and the remaining 1/2 cup of butter. Stir gently and consistently until both the chocolate and butter are completely melted and smooth. Alternatively, you can melt them in the microwave in 30-second intervals, stirring after each, until smooth. Be careful not to overheat the chocolate, as it can scorch.
Once your chocolate coating is smooth and glossy, remove it from the heat. Allow it to cool slightly for a few minutes. You don’t want it piping hot when you pour it over your frozen dessert, as it can melt the ice cream too quickly. However, you also don’t want it to start seizing up. It should be pourable but not too hot.
Retrieve your frozen dessert from the freezer. Pour the slightly cooled chocolate mixture evenly over the peanut layer. Use your spatula to spread it quickly and smoothly, covering the entire top surface. Work efficiently to ensure the chocolate sets before it melts too much of the underlying layers.
Once the chocolate is spread, return the entire dessert to the freezer for at least another 2-3 hours, or until the chocolate is completely set and firm. This final freeze is essential for achieving those clean, crisp slices that are characteristic of a Buster Bar.
Serving Your Masterpiece
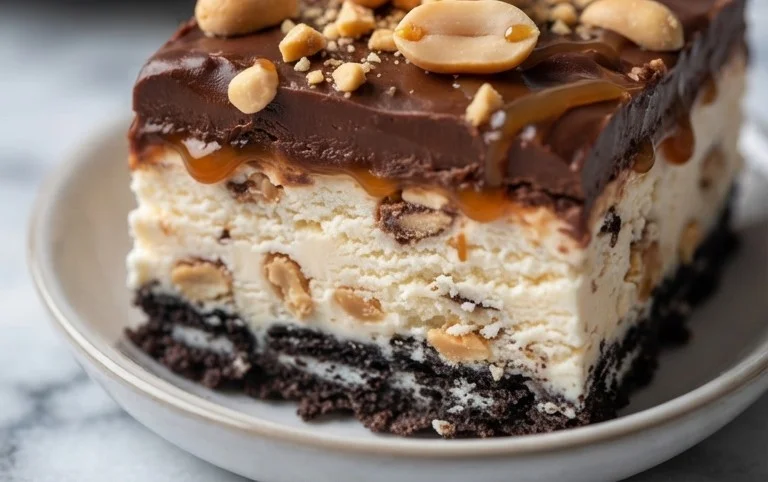
When your Buster Bar Ice Cream Dessert is fully frozen and the chocolate shell is firm, it’s time to serve! To get those clean slices, you can dip a sharp knife in hot water and dry it before cutting. This will help the knife glide through the frozen layers and the chocolate coating without cracking. Cut the dessert into squares or bars, just like the origin extractal. You’ll be rewarded with beautiful layers of cookie crust, creamy ice cream, sweet peanut filling, and a rich chocolate shell. Enjoy this delightful homemade treat – you’ve earned it!
Conclusion:
There you have it – your guide to creating the ultimate Buster Bar Ice Cream Dessert! This recipe is a fantastic choice because it delivers that iconic, nostalgic flavor we all love in a homemade package. It’s surprisingly simple to assemble, making it perfect for both seasoned bakers and kitchen novices alike. The delightful combination of creamy ice cream, rich chocolatey coating, and crunchy peanuts is a guaranteed crowd-pleaser, sure to bring smiles to any gathering or even just a quiet evening in. I truly encourage you to give this Buster Bar Ice Cream Dessert a try; it’s a truly rewarding experience!
For serving, I recommend slicing it into generous portions and letting it sit for a few minutes at room temperature to achieve the perfect texture. It’s also wonderful served with a drizzle of extra chocolate sauce or a sprinkle of chopped nuts for added decadence. When it comes to variations, feel free to experiment! You could swap the peanuts for almonds or pecans, use a different flavor of ice cream like mint chocolate chip, or even add a layer of caramel before the chocolate coating. The possibilities are endless, and the joy of customizing this classic treat is part of what makes it so special.
Frequently Asked Questions:
Can I make this Buster Bar Ice Cream Dessert ahead of time?
Absolutely! This dessert is actually best made a day in advance. This allows the chocolate coating to fully harden and the flavors to meld beautifully. Just be sure to keep it frozen until you’re ready to serve.
What kind of chocolate should I use for the coating?
For the best results, I recommend using good quality semi-sweet or dark chocolate chips or a chopped chocolate bar. Adding a tablespoon or two of coconut oil or vegetable oil to the melted chocolate will help create a smoother, more flexible coating that’s less prone to cracking when you slice into it.
What if I don’t have peanuts? Can I omit them or use something else?
Of course! While peanuts are traditional, they’re not essential. You can absolutely omit them if you have allergies or simply prefer not to use them. Alternatively, you could substitute them with chopped almonds, pecans, or even crispy rice cereal for a different kind of crunch.
Buster Bar Ice Cream Dessert
A no-bake ice cream dessert inspired by the classic Buster Bar, featuring a cookie crust, creamy ice cream, peanuts, and a chocolate coating.
Ingredients
-
1 14.3 oz pkg. of Oreo cookies, crushed
-
1/2 C butter, melted
-
1/2 gal. vanilla ice cream, softened
-
1 lb. Spanish peanuts
-
2 C powdered confectioner’s sugar
-
12 oz semi sweet chocolate chips
-
1/2 C butter
-
12 oz evaporated milk
Instructions
-
Step 1
Combine crushed Oreo cookies and 1/2 C melted butter. Press firmly into the bottom of a 9×13 inch pan to form a crust. -
Step 2
Spread the softened vanilla ice cream evenly over the cookie crust. -
Step 3
Sprinkle the Spanish peanuts evenly over the ice cream layer. -
Step 4
In a saucepan, melt 12 oz semi sweet chocolate chips and 1/2 C butter over low heat, stirring until smooth. Gradually whisk in 12 oz evaporated milk and 2 C powdered confectioner’s sugar until a smooth sauce forms. -
Step 5
Pour the warm chocolate sauce evenly over the peanut layer, ensuring it covers the entire surface. -
Step 6
Freeze for at least 4 hours, or until firm. Cut into bars and serve immediately.
Important Information
Nutrition Facts (Per Serving)
It is important to consider this information as approximate and not to use it as definitive health advice.
Allergy Information
Please check ingredients for potential allergens and consult a health professional if in doubt.