Easy Dinner Recipe – Quick & Delicious Meals
Loading… This is more than just a dish; it’s an experience, a culinary hug, and a guaranteed crowd-pleaser. When you mention ‘Loading…’, you’re conjuring images of pure comfort and unadulterated joy. What is it about this particular creation that has everyone coming back for more? It’s the perfect alchemy of textures and flavors, a symphony of savory goodness that warms you from the inside out. We love it because it’s incredibly satisfying without being overly complicated, making it ideal for weeknight dinners or impressive weekend gatherings. The secret to truly spectacular ‘Loading…’ lies in its ability to adapt, to absorb every delicious nuance you throw its way, promising a uniquely personal and deeply delicious outcome every single time. Get ready to discover why this dish is such a beloved staple.
Ingredients:
When you’re craving something delicious, satisfying, and relatively quick to prepare, you can’t go wrong with perfectly cooked chicken breast. This recipe is designed to deliver tender, flavorful chicken every time, whether you’re looking for a weeknight dinner hero or a foundation for more elaborate meals. We’re going to focus on building flavor from the ground up, ensuring each bite is a delight.
One of the most crucial steps, often overlooked, is how you prepare the chicken itself. Before we even think about seasoning, we’re going to start by patting the chicken dry. This is a simple yet incredibly effective technique. Using paper towels, gently but thoroughly dry the surface of each chicken breast. This removes any excess moisture, which is essential for two key reasons. Firstly, it allows your seasonings to adhere much better, creating a more even and flavorful crust. Secondly, it helps the chicken to brown properly when it hits the heat, contributing to a more appealing color and texture. Don’t skip this step – it makes a noticeable difference!
Building the Flavor Base
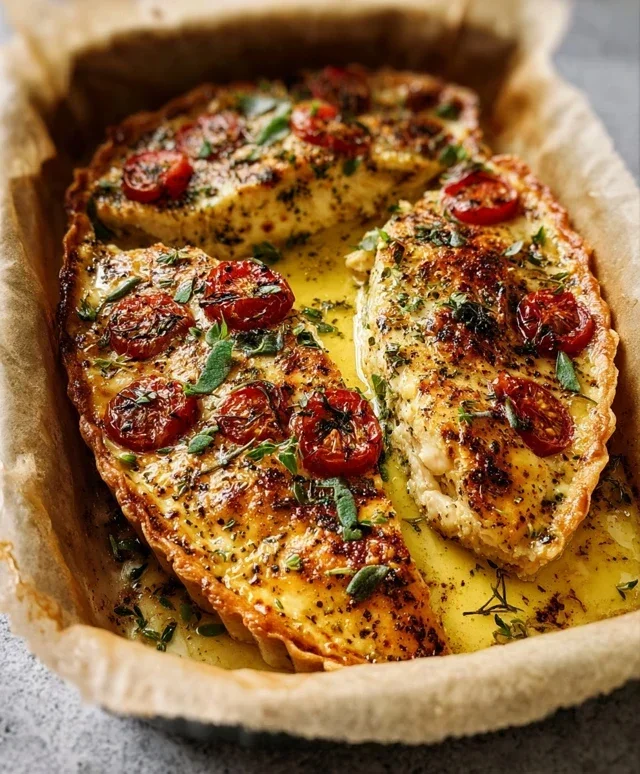
Now that our chicken is prepped and ready, it’s time to infuse it with some fantastic flavors. In a small bowl, we’ll combine our dry seasonings. The smoked paprika brings a wonderful warmth and a hint of smokiness, even without grilling. The garlic powder and onion powder are pantry staples that provide a savory depth. Dried oregano adds an herbaceous note, and of course, we have our trusty black pepper and salt to enhance everything.
Whisk these spices together thoroughly to ensure they are evenly distributed. This is important so you don’t end up with pockets of overpowering flavor. Once mixed, we’ll lightly coat the dried chicken breasts with our olive oil. Just a thin layer is needed to help the seasoning blend adhere. Then, generously sprinkle the spice mixture over all sides of the chicken, pressing it in gently to ensure it sticks. Make sure to coat the edges too!
Cooking for Perfection
We have a couple of excellent options for cooking this chicken to perfection. Pan-searing is a fantastic method for achieving a beautiful crust and juicy interior quickly. Alternatively, baking offers a hands-off approach that’s equally delicious. We’ll detail the pan-searing method here, as it’s often the go-to for speed and that lovely seared finish.
1. Heat your skillet: Place a non-stick or cast-iron skillet over medium-high heat. Add a drizzle more olive oil if your pan isn’t particularly non-stick. Allow the pan to get nice and hot – you should feel the warmth radiating from it. A properly heated pan is key to a good sear.
2. Sear the chicken: Carefully place the seasoned chicken breasts into the hot skillet. You should hear a satisfying sizzle immediately. Avoid the urge to move the chicken around too much in the first few minutes. Let it sear undisturbed for about 5-7 minutes per side, depending on the thickness of your chicken breasts. This allows a beautiful golden-brown crust to form.
3. Reduce heat and continue cooking: Once both sides are nicely seared, reduce the heat to medium-low. This is crucial to ensure the chicken cooks through to the center without burning on the outside. Continue to cook, flipping occasionally, for an additional 8-12 minutes, or until the chicken is cooked through.
4. Check for doneness: This is where precision is important for both safety and optimal texture. Use a meat thermometer to check that your chicken reaches 165°F (74°C). Insert the thermometer into the thickest part of the chicken breast, making sure not to touch any bone if you were using bone-in chicken (which we’re not here). The temperature should register at 165°F for perfectly cooked, safe chicken. If it’s not quite there, continue cooking for a few more minutes and check again.
5. Rest and serve: Once the chicken has reached the correct temperature, remove it from the skillet and place it on a clean cutting board. Now, for another vital step that contributes to juiciness: Let the chicken rest for about 5 minutes after cooking. During cooking, the juices in the chicken are pushed towards the center. Resting allows these juices to redistribute throughout the meat. If you cut into it immediately, all those delicious juices would run out onto the board, leaving you with drier chicken. After resting, slice the chicken against the grain and serve. Garnish with fresh chopped parsley for a pop of color and freshness, if desired.
This versatile chicken breast can be enjoyed on its own, sliced and added to salads, tucked into sandwiches, or served alongside your favorite vegetables and grains. The simple seasoning blend ensures it pairs well with a variety of flavors. Enjoy your perfectly cooked, succulent chicken!

Conclusion:
I hope you’re as excited as I am to try this incredible recipe! It’s truly a game-changer, offering a perfect balance of flavors and textures that will impress your family and friends. Whether you’re a seasoned cook or just starting out, this dish is designed to be approachable yet deliver exceptional results. The beauty of this recipe lies in its versatility, making it ideal for a weeknight dinner or a special occasion. I genuinely encourage you to dive in and experience the deliciousness for yourself!
For serving, consider pairing it with a crisp green salad, fluffy rice, or crusty bread to soak up any extra sauce. If you’re feeling adventurous, this recipe also welcomes variations. Feel free to add your favorite vegetables like bell peppers or spinach, or spice things up with a pinch of chili flakes. Don’t be afraid to experiment and make it your own!
Frequently Asked Questions:
Can I make this recipe ahead of time?
Yes, absolutely! Many components of this recipe can be prepared in advance, making assembly on the day much quicker. The flavors often meld beautifully overnight, so don’t hesitate to prep components the day before.
What if I don’t have a specific ingredient?
That’s the joy of cooking! For most ingredients, there are excellent substitutes. For example, if a particular herb isn’t available, try another fresh herb with a similar profile, or use a dried version sparingly. I’ve found that a little creativity goes a long way!
Is this recipe suitable for vegetarians or vegans?
With a few simple adjustments, this recipe can easily be adapted. For a vegetarian version, consider substituting the meat with hearty vegetables or a plant-based protein. For a vegan option, ensure all dairy or animal products are replaced with plant-based alternatives. I’m confident you can create a fantastic version that suits your dietary needs.
Simply Roasted Chicken
A basic yet delicious roasted chicken recipe focused on proper technique for juicy and tender results. This method ensures safe consumption and optimal flavor.
Ingredients
-
1 whole chicken
-
Salt
-
Black pepper
-
Olive oil
-
Garlic powder
-
Onion powder
Instructions
-
Step 1
Preheat your oven to 400°F (200°C). -
Step 2
Start by patting the chicken dry with paper towels; this helps the seasoning stick better. -
Step 3
Rub the chicken all over with olive oil, then season generously with salt, black pepper, garlic powder, and onion powder. -
Step 4
Place the chicken in a roasting pan and roast for approximately 1 hour and 20 minutes, or until the juices run clear. -
Step 5
Use a meat thermometer to check that your chicken reaches 165°F (74°C) in the thickest part of the thigh, avoiding the bone. This ensures it’s safe to eat, yet still tender. -
Step 6
Let the chicken rest for about 5 minutes after cooking, loosely tented with foil. This lets the juices redistribute, making each bite more succulent.
Important Information
Nutrition Facts (Per Serving)
It is important to consider this information as approximate and not to use it as definitive health advice.
Allergy Information
Please check ingredients for potential allergens and consult a health professional if in doubt.