Easy Homemade Bread Recipe – Bake This Delicious Loaf
Homemade bread is more than just a recipe; it’s an experience. There’s a primal satisfaction, a comforting ritual, in transforming simple ingredients—flour, water, yeast, and salt—into a warm, crusty loaf that fills your kitchen with an irresistible aroma. Why do we continue to bake our own bread, even with a plethora of store-bought options available? Because nothing compares to the unparalleled taste and texture of freshly baked homemade bread. It’s the slightly chewy interior, the satisfying crackle of the golden crust, and the knowledge that you created this goodness with your own hands. This isn’t just about sustenance; it’s about creating moments of connection, whether you’re sharing it with family or savoring a quiet moment of delicious solitude. Today, we’re diving deep into the art of crafting your own perfect loaf of homemade bread, a journey that’s both rewarding and utterly delicious.
Homemade Bread: The Comfort of a Fresh Loaf
There’s an unparalleled joy in pulling a warm, fragrant loaf of homemade bread from your own oven. The aroma alone is enough to transform your kitchen into a haven of comfort and deliciousness. Forget the store-bought versions; once you experience the tender crum extractb and satisfying crust of a bread baked with your own hands, you’ll be hooked. This recipe is designed to be approachable for begin extractners, yet yields results that will impress even seasoned bakers. We’ll walk through each step, demystifying the process and empowering you to create this kitchen staple with confidence. The beauty of homemade bread lies in its simplicity and the incredible reward it offers.
Ingredients:
Getting Started: Activating the Yeast
The foundation of a good loaf is active, happy yeast. To begin extract, pour the warm water into a large mixing bowl. It’s crucial that the water is the right temperature – too hot and you’ll kill the yeast, too cold and it won’t activate. A good rule of thumb is that it should feel comfortably warm to the touch, like a baby’s bath. Next, sprinkle the active dry yeast over the surface of the water. Let it sit for about 5-10 minutes. You’ll know it’s ready when it becomes foamy and bubbly, resembling a creamy head on a non-alcoholic beer. This means the yeast is alive and ready to work its magic, producing those lovely air pockets that give bread its characteristic texture. If you don’t see this foam, your yeast might be old or the water was the wrong temperature, and you’ll need to start again.
Mixing the Dough
Once your yeast is nicely foamed, it’s time to add the rest of the wet ingredients and the salt. Add the honey or sugar, and the oil to the yeast mixture. Stir gently to combine. Now, it’s time for the flour. Start by adding 4 cups of flour to the wet ingredients. If you’re using a stand mixer with a dough hook attachment, this is where you’ll want to use it. Mix on low speed until the ingredients just start to come together. If you’re mixing by hand, use a sturdy spoon or spatula until it becomes too difficult to stir, then switch to using your hands. Gradually add more flour, about 1/4 cup at a time, until the dough begin extracts to pull away from the sides of the bowl and form a shaggy ball. Be careful not to add too much flour at this stage; a slightly sticky dough is better than a dry, tough one. The goal is to achieve a dough that is soft and pliable but not overly sticky.
Kneading the Dough
Kneading is a vital step that develops the gluten in the flour, which is responsible for the bread’s structure and chegrape juicess. If you’re using a stand mixer, increase the speed to medium-low and knead for about 8-10 minutes. The dough should become smooth, elastic, and less sticky, eventually clearing the sides of the bowl. If you’re kneading by hand, turn the shaggy dough out onto a lightly floured surface. Push the dough away from you with the heels of your hands, then fold it back over itself. Rotate the dough a quarter turn and repeat. Continue this rhythmic process for about 10-15 minutes. You’ll know the dough is ready when it’s smooth, elastic, and springs back when you gently poke it with your finger. It should also pass the ‘windowpane test’: you should be able to stretch a small piece of dough very thin without it tearing, allowing light to pass through it.
First Rise: The Dough’s Transformation
Lightly oil a clean, large bowl. Place the kneaded dough into the oiled bowl, turning it once to coat the entire surface with oil. This prevents a dry crust from forming. Cover the bowl tightly with plastic wrap or a damp kitchen towel. Place the bowl in a warm, draft-free spot to rise. This is often the warmest place in your kitchen, perhaps on top of your refrigerator or near a pilot light on your stove. Allow the dough to rise for about 1 to 1.5 hours, or until it has doubled in size. The exact time will depend on the temperature of your kitchen. During this time, the yeast is busily producing carbon dioxide gas, which makes the dough expand. It’s a fascinating process to watch!
Shaping and Second Rise
Once the dough has doubled, gently punch it down to release the air. Turn the dough out onto a lightly floured surface and shape it into your desired loaf form. You can create a classic round boule, an oblong loaf, or even smaller rolls. To form a round loaf, gently tuck the edges of the dough underneath itself until it forms a taut ball. For an oblong loaf, pat the dough into a rectangle and then roll it up tightly, pinching the seam closed. Place the shaped dough onto a baking sheet lined with parchment paper or into a greased loaf pan. Cover the loaf loosely with plastic wrap or a clean kitchen towel and let it rise again for another 30-45 minutes, or until it has nearly doubled in size. This second rise is crucial for a light and airy interior.
Baking to Golden Perfection
Preheat your oven to 375 degrees Fahrenheit (190 degrees Celsius). Once the dough has completed its second rise, you can optionally score the top of the loaf with a sharp knife or razor blade. This helps control where the bread expands as it bakes and creates a beautiful rustic look. Carefully place the loaf into the preheated oven. Bake for 30-40 minutes, or until the crust is a deep golden brown and the internal temperature of the bread reaches around 200-210 degrees Fahrenheit (93-99 degrees Celsius) when tested with an instant-read thermometer. If you don’t have a thermometer, the bread is done when it sounds hollow when tapped on the bottom. For an extra crispy crust, you can place a shallow pan of water on the bottom rack of your oven while it preheats and into the first 20 minutes of baking to create steam.
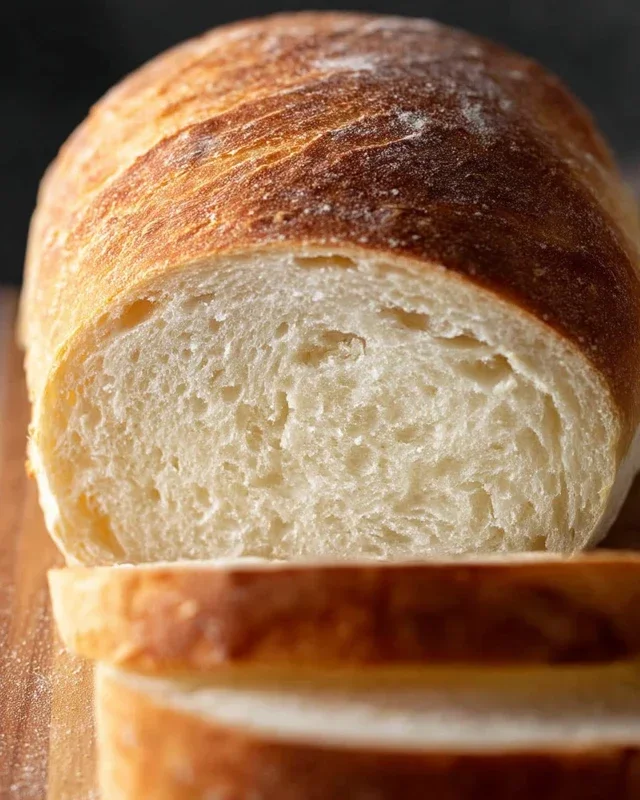
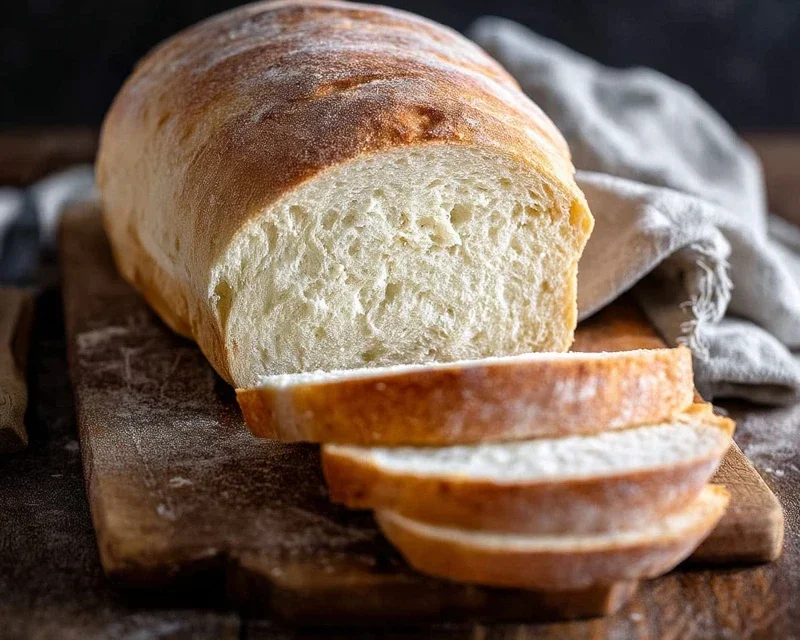
Cooling and Enjoying
Once baked, immediately remove the bread from the oven and transfer it to a wire rack to cool completely. Resist the urge to cut into it right away! Allowing the bread to cool is essential for the internal structure to set. Cutting into it too soon can result in a gummy texture. Once cooled, slice your magnificent homemade bread and enjoy the fruits of your labor. It’s perfect on its own, toasted with butter, or as the base for your favorite sandwiches. The aroma, the texture, the flavor – it’s an experience that’s hard to beat. Happy baking!
Conclusion:
Now that you’ve mastered the art of making delicious homemade bread, you’ve unlocked a truly rewarding culinary skill. This recipe isn’t just about creating a loaf; it’s about experiencing the joy of transforming simple ingredients into something warm, comforting, and incredibly satisfying. The aroma that fills your kitchen as it bakes is incomparable, and the taste of freshly baked bread, still warm from the oven, is a pure delight. I encourage you to embrace this recipe and make it your own. Don’t be afraid to experiment with different flours, add herbs, seeds, or even a touch of sweetness to personalize your loaves.
Serve your beautiful homemade bread with butter, olive oil for dipping, alongside soups and stews, or as the base for amazing sandwiches. Think about trying a rye flour blend for a deeper flavor, or adding rosemary and garlic for an Italian-inspired loaf. The possibilities are endless!
Frequently Asked Questions:
Why is my homemade bread so dense?
Density can be caused by several factors. Ensure you’re measuring your flour correctly – spooning it into the cup rather than scooping directly. Overmixing the dough can also develop gluten too much, leading to a dense crum extractb. Make sure you’re allowing sufficient rising time in a warm environment.
Can I freeze my homemade bread?
Absolutely! Once your bread has cooled completely, wrap it tightly in plastic wrap and then in aluminum foil, or place it in a freezer-safe bag. It should stay fresh in the freezer for up to 3 months. Thaw at room temperature or gently reheat in the oven.
What’s the best way to store homemade bread?
For short-term storage (2-3 days), a bread box or a loosely tied paper bag is ideal. This allows the crust to remain somewhat crisp. For longer storage, once cooled, wrap it well to prevent it from drying out.
Homemade Bread
A simple and delicious recipe for classic homemade bread, perfect for sandwiches or toast.
Ingredients
-
2 cups warm water (105-115 degrees)
-
1 Tablespoons active dry yeast
-
1/4 cup honey
-
2 teaspoons salt
-
2 Tablespoons canola oil
-
4 – 5 1/2 cups all-purpose flour
Instructions
-
Step 1
In a large bowl, combine the warm water and honey. Sprinkle the yeast over the top and let it sit for 5-10 minutes until foamy. -
Step 2
Stir in the salt and oil. -
Step 3
Gradually add the flour, 1 cup at a time, mixing until a shaggy dough forms. You may not need all of the flour. -
Step 4
Turn the dough out onto a lightly floured surface and knead for 8-10 minutes until smooth and elastic. -
Step 5
Place the dough in a greased bowl, cover, and let it rise in a warm place for about 1 hour, or until doubled in size. -
Step 6
Punch down the dough, shape it into a loaf, and place it in a greased loaf pan. Cover and let rise for another 30 minutes. -
Step 7
Preheat oven to 375°F (190°C). Bake for 30-35 minutes, or until golden brown and the internal temperature reaches 190-200°F (88-93°C).
Important Information
Nutrition Facts (Per Serving)
It is important to consider this information as approximate and not to use it as definitive health advice.
Allergy Information
Please check ingredients for potential allergens and consult a health professional if in doubt.