Easy No-Bake Apple Pie Cheesecake Delight
No bake apple pie cheesecake is the ultimate dessert dream for anyone who adores the comforting embrace of fall flavors but shuns the oven. Imagin extracte this: a creamy, dreamy cheesecake filling, infused with the warm, spiced essence of baked apples, all nestled atop a buttery, grabeef ham cracker crust. It’s pure, unadulterated bliss, a harmonious marriage of two beloved classics. People go absolutely wild for this no bake apple pie cheesecake because it delivers all the nostalgic joy of apple pie and the decadent richness of cheesecake, without a single oven mitt required. What truly sets this dessert apart is its effortless elegance. You get all those incredible, complex flavors and textures – the slight tartness of the apples, the sweet, creamy cheesecake, and that satisfying crunch – with a fraction of the effort. It’s a showstopper that’s surprisingly easy to whip up, making it perfect for impromptu gatherings or when that irresistible craving strikes. Get ready to fall head over heels for this magical no bake apple pie cheesecake.
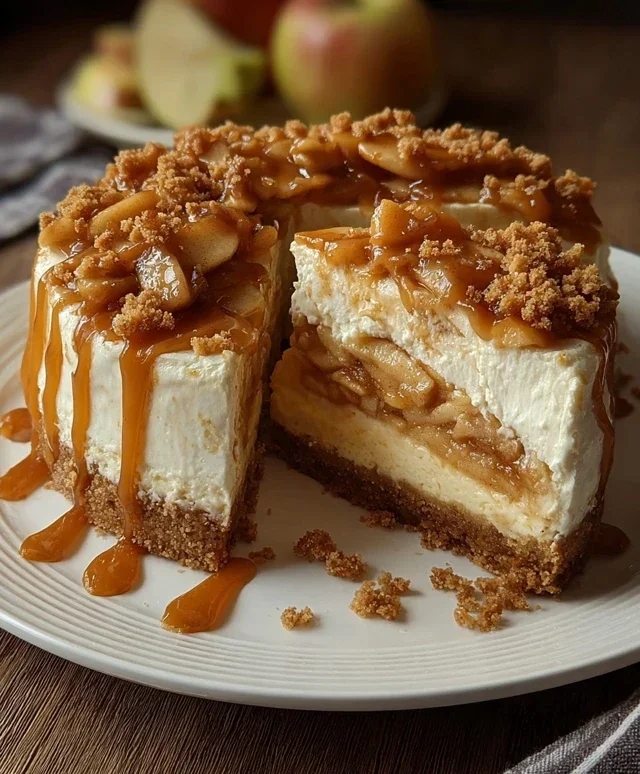
No Bake Apple Pie Cheesecake
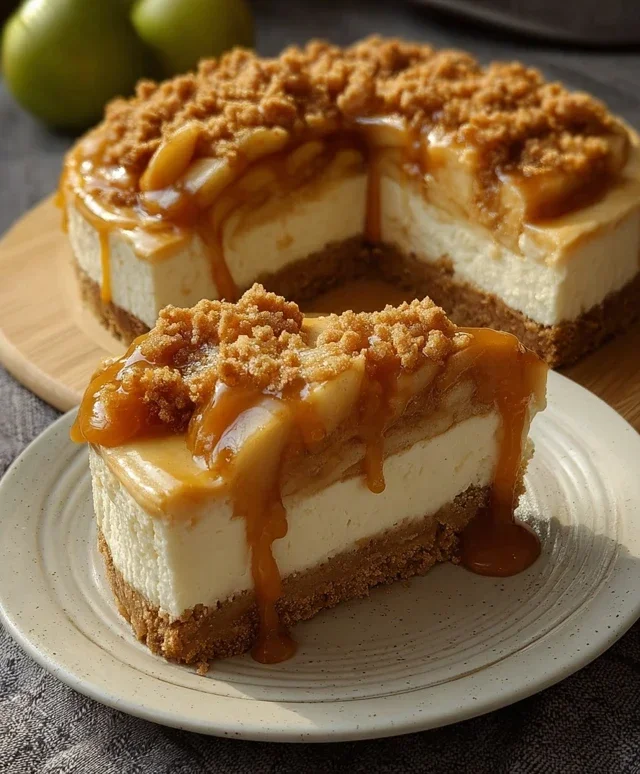
There’s something magical about the combination of creamy cheesecake and warm, spiced apples. Usually, this decadent dessert requires a significant amount of time in the oven, but what if I told you we could achieve all that flavor and texture with absolutely no baking required? That’s right, this No Bake Apple Pie Cheesecake is my secret weapon for satisfying those apple pie cravings without the fuss of preheating the oven. It’s incredibly satisfying to whip up a dessert that looks and tastes so impressive, all while keeping things wonderfully simple. The crunchy, buttery crust is a perfect foundation for the luscious, tangy cheesecake filling, and the warmly spiced apple topping brings it all together beautifully. Get ready to impress yourself and anyone lucky enough to share this with you.
Ingredients:
Cooking Instructions:
Let’s dive into creating this delightful dessert! We’ll break it down into a few key stages: preparing the crust, making the spiced apple topping, and finally, assembling the cheesecake.
1. Crafting the No-Bake Crust
First things first, we need to make our delicious crust. In a medium bowl, combine the 70g of brown sugar, 20g of granulated sugar, and 60g of soft butter. You want your butter to be softened, not melted, so it creams nicely with the sugars. Use a fork or a spatula to mix these together until they form a sandy, crum extractbly texture. Now, add the 90g of all-purpose flour and 1 tsp of ground cinnamon. Mix everything together until it’s well combined and forms a dough that’s slightly crum extractbly but holds together when you squeeze it. I like to press this mixture directly into the bottom of my springform pan. Don’t worry about making it perfectly even at this stage; just aim for a nice, even layer across the base. For a firmer crust, you can chill this in the freezer for about 15-20 minutes while you prepare the other components. This step is crucial for ensuring your crust holds its shape and has a satisfying crunch.
2. Simmering the Spiced Apple Topping
Now for the star of the show – the apples! In a medium saucepan, melt the 60g of butter over medium heat. Once melted, add your peeled and sliced apples. Don’t overcrowd the pan; you might need to do this in batches if your pan isn’t large enough. Add the peel of 1 lemon (just the yellow part, no white pith, as it can be bitter) and the 2 star anise. These aromatic spices will infuse the apples with an incredible depth of flavor. Stir in 2 tsp of ground cinnamon and 70g of brown sugar. Cook the apples, stirring occasionally, for about 10-15 minutes, or until they start to soften but still hold their shape. We don’t want them to turn to mush. In a small bowl, whisk together 1 tsp of cornstarch with 2 tbsp of cold water to create a slurry. Pour this into the saucepan with the apples and stir constantly until the mixture thickens slightly. This will give our apple topping a lovely glossy finish and help it adhere better to the cheesecake. Remove the star anise and lemon peel before you use the apples. Let this mixture cool down completely. It’s important that it’s cool to avoid melting the cream cheese when we assemble.
3. Preparing the Creamy Cheesecake Filling
While the apples are cooling, let’s get to the luscious cheesecake filling. Ensure your 500g of cream cheese is softened to room temperature. This is essential for achieving a smooth, lump-free cheesecake. In a large bowl, beat the softened cream cheese with an electric mixer on medium speed until it’s completely smooth and creamy. Scrape down the sides of the bowl as needed. Now, add the ½ tsp of ground cinnamon and mix it in. If you prefer a sweeter filling, you can add a tablespoon or two of powdered sugar at this stage, but I find the sweetness from the apples and crust is usually enough. Continue beating until everything is thoroughly combined and the mixture is light and airy. The goal here is a wonderfully smooth, decadent, and slightly tangy base for our apple topping.
4. Assembling Your Masterpiece
This is where it all comes together! Take your chilled crust out of the freezer. If you didn’t use a springform pan, carefully transfer your crust mixture into your serving dish and press it firmly into an even layer. Spoon the cooled, spiced apple mixture over the crust, spreading it evenly. Make sure you get all those lovely spiced apples distributed across the top. Now, gently spoon the cream cheese filling over the apple layer. Use a spatula to spread it out smoothly, creating an even surface. You can create some decorative swirls on top with your spatula if you like, adding to the rustic charm of this dessert. The contrast of the warm spiced apples peeking through the creamy white filling is absolutely beautiful.
5. Chilling and Serving Perfection
The final, and perhaps most challengin extractg, step: patience! Cover your no-bake cheesecake loosely with plastic wrap or foil. You want to avoid the plastic touching the surface directly if possible. Place the cheesecake in the refrigerator for at least 4-6 hours, or preferably overnight. This chilling time is crucial for the cheesecake to set properly and for the flavors to meld together. The longer it chills, the firmer and more delicious it will be. Once it’s set, carefully release the sides of your springform pan. If you used a regular dish, you can serve it directly from there. Slice into generous portions and prepare for the rave reviews. This No Bake Apple Pie Cheesecake is truly a showstopper, proving that you don’t need an oven to create something utterly divine. Enjoy every creamy, spiced bite!
Conclusion:
And there you have it – a truly sensational No Bake Apple Pie Cheesecake that’s going to become your new go-to dessert! The beauty of this recipe lies in its effortless preparation, allowing you to achieve that classic apple pie flavor profile combined with the creamy, dreamy indulgence of cheesecake, all without even turning on the oven. It’s the perfect solution for those hot summer days when you crave something sweet and comforting but don’t want to heat up your kitchen. The crunchy grabeef ham cracker crust, the spiced apple filling, and the smooth cheesecake layer create a symphony of textures and tastes that will have everyone asking for seconds.
I absolutely love serving this No Bake Apple Pie Cheesecake chilled, maybe with a dollop of whipped cream or a sprinkle of extra cinnamon. It’s also fantastic with a scoop of vanilla bean ice cream. If you’re feeling adventurous, consider adding a handful of chopped pecans or walnuts to the crust for extra crunch, or a swirl of caramel sauce over the top for an extra layer of decadence. Don’t be afraid to experiment with different spices in your apple filling – a pinch of nutmeg or allspice can add a wonderful depth of flavor. I truly encourage you to give this recipe a try. It’s so rewarding to create something so delicious with minimal effort!
Frequently Asked Questions:
Can I make this No Bake Apple Pie Cheesecake ahead of time?
Absolutely! In fact, making it ahead of time is highly recommended. It needs at least 4-6 hours to chill and set properly in the refrigerator, but overnight is even better. This allows all the flavors to meld together beautifully.
What kind of apples are best for the filling?
For the best flavor and texture, I recommend using a mix of sweet and tart apples. Granny Smith apples provide a nice tartness and hold their shape well when cooked, while Honeycrisp or Fuji apples offer sweetness. Ensure they are peeled, cored, and diced into small, uniform pieces.
How long will the No Bake Apple Pie Cheesecake last in the refrigerator?
Stored in an airtight container in the refrigerator, this cheesecake should stay fresh and delicious for about 3 to 4 days. The crust might soften slightly over time, but the flavor will remain excellent.
No-Bake Apple Pie Cheesecake
A delightful no-bake cheesecake with layers of spiced apple filling and a buttery graham cracker crust, reminiscent of apple pie.
Ingredients
-
70g brown sugar
-
20g granulated sugar
-
60g soft butter
-
90g all-purpose flour
-
1 tsp ground cinnamon
-
5 medium apples, peeled and sliced
-
Peel of 1 lemon
-
2 star anise
-
2 tsp ground cinnamon
-
60g butter
-
70g water
-
120g brown sugar
-
1 tsp cornstarch + 2 tbsp cold water
-
500g cream cheese
-
½ tsp ground cinnamon
Instructions
-
Step 1
For the crust: Combine 70g brown sugar, 20g granulated sugar, 60g soft butter, 90g all-purpose flour, and 1 tsp ground cinnamon in a bowl. Mix until crumbly. Press into the bottom of a springform pan. -
Step 2
For the apple filling: In a saucepan, combine sliced apples, lemon peel, 2 star anise, 2 tsp ground cinnamon, 60g butter, 70g water, and 120g brown sugar. Cook over medium heat until apples are tender, about 10-15 minutes. -
Step 3
Remove star anise from the cooked apples. Thicken the apple mixture by stirring in the cornstarch slurry (1 tsp cornstarch mixed with 2 tbsp cold water). Cook for 1-2 minutes until thickened. Let cool slightly. -
Step 4
For the cheesecake filling: Beat 500g cream cheese until smooth. Gradually beat in ½ tsp ground cinnamon and a touch of sweetener if desired, until well combined. -
Step 5
Spread the cream cheese mixture evenly over the prepared crust. -
Step 6
Spoon the cooled apple filling over the cream cheese layer. -
Step 7
Chill in the refrigerator for at least 4 hours, or until set, before serving.
Important Information
Nutrition Facts (Per Serving)
It is important to consider this information as approximate and not to use it as definitive health advice.
Allergy Information
Please check ingredients for potential allergens and consult a health professional if in doubt.