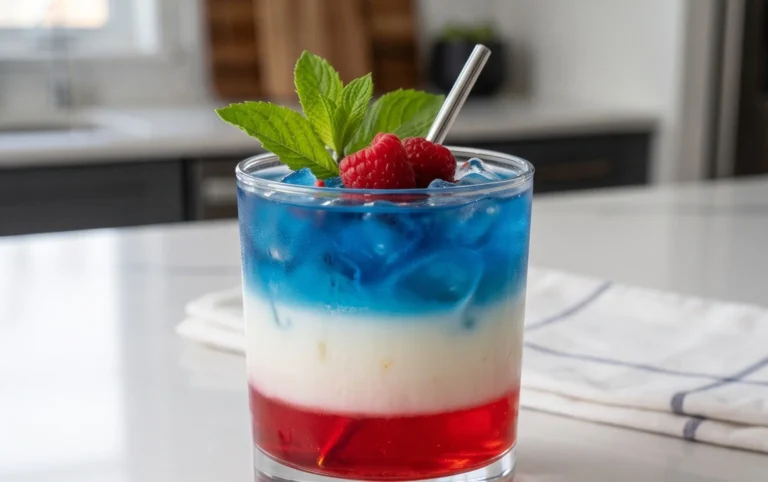
Red White Blue Cheesecake Strawberries Delight
Red, White, and Blue Cheesecake Strawberries are more than just a dessert; they’re a vibrant celebration on a plate! Imagin extracte plump, juicy strawberries transformed into miniature masterpieces, bursting with creamy cheesecake filling and a patriotic flourish. What’s not to adore about this delightful treat? It’s the perfect marriage of fresh, sweet fruit and rich, decadent cheesecake, offering a delightful contrast in both flavor and texture that is utterly irresistible. These Red, White, and Blue Cheesecake Strawberries are incredibly special because they capture the essence of summer gatherings, holidays, and any occasion that calls for a touch of festive flair. They’re surprisingly easy to make, allowing you to impress your guests without spending hours in the kitchen. Get ready to fall in love with this stunning and delicious dessert!
Red, White, and Blue Cheesecake Strawberries: A Patriotic Treat!
Get ready to celebrate in delicious style with these delightful Red, White, and Blue Cheesecake Strawberries! They’re the perfect no-bake dessert for any summer gathering, Fourth of July party, or simply when you’re craving something sweet and festive. Imagin extracte the burst of juicy strawberry, the creamy, tangy cheesecake filling, and the pop of fresh blueberries – it’s a flavor explosion that’s as beautiful as it is tasty. These little bites are surprisingly easy to make, making them an ideal project for bakers of all skill levels. Plus, they’re inherently portion-controlled, making them a guilt-free indulgence. Let’s dive into how you can create these patriotic delights right in your own kitchen.
Ingredients:
Crafting the Creamy Cheesecake Filling
The heart of these delightful treats is a simple yet incredibly satisfying cheesecake filling. To begin extract, ensure your 8-ounce package of cream cheese is properly softened. This is crucial for achieving a smooth, lump-free filling. Leaving it on the counter for about an hour or two should do the trick, or you can gently soften it in the microwave in short, 15-second bursts, being careful not to melt it. In a medium bowl, combine the softened cream cheese with 1/2 cup of confectioners’ sugar. Confectioners’ sugar, also known as powdered sugar, has a fine texture that dissolves easily and helps create a silky smooth consistency without any grittiness. Use an electric mixer, either a hand mixer or a stand mixer with the paddle attachment, to beat the cream cheese and confectioners’ sugar together until they are light, fluffy, and well combined. This process will take a few minutes, and it’s important to scrape down the sides of the bowl periodically to ensure everything is incorporated evenly.
Next, it’s time to introduce the airy lightness of the whipped topping. Make sure your whipped topping is fully thawed but not deflated. Gently fold 1 cup of the thawed whipped topping into the cream cheese mixture. Folding is a gentle technique that helps maintain the airiness of the whipped topping. You want to incorporate it until just combined, avoiding overmixing, which can deflate the mixture and make it heavy. Finally, for a touch of sophisticated flavor that complements the sweetness and tangin extractess of the filling, add 1/2 teaspoon of almond extract. Almond extract has a distinct, slightly nutty flavor that pairs wonderfully with cream cheese and berries, but if you’re not a fan of almond, you can substitute it with 1/4 teaspoon of vanilla extract for a classic flavor profile. Give the mixture a final gentle stir to distribute the extract evenly.
Assembling Your Patriotic Masterpieces
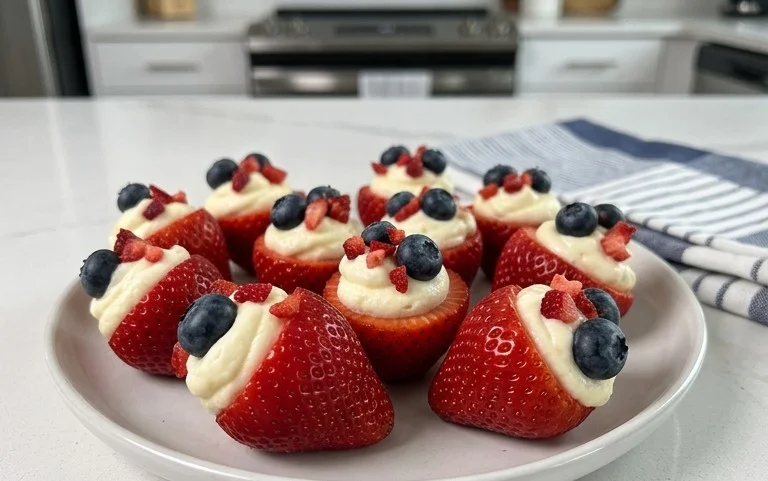
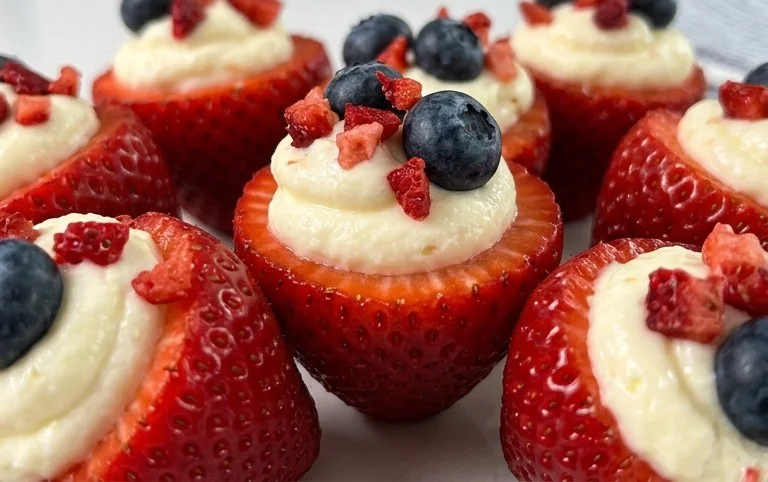
Now for the fun part: assembling these beautiful Red, White, and Blue Cheesecake Strawberries! First, prepare your strawberries. Select 12 large, ripe strawberries. Wash them gently under cool water and pat them thoroughly dry with a paper towel. It’s essential that the strawberries are dry to prevent the cheesecake filling from sliding off. Carefully slice each strawberry in half lengthwise, creating a flat surface on each half. These will serve as your “boats” for the creamy filling.
Next, you’ll want to create a stable base for your filling. Take the halved strawberries and place them, cut-side up, on a serving platter or baking sheet lined with parchment paper. The parchment paper will make cleanup a breeze. Now, using a small spoon or a piping bag fitted with a round tip (if you want extra neatness), generously fill the hollowed-out part of each strawberry half with the prepared cheesecake filling. Aim for a generous dollop that sits nicely on the strawberry without overflowing too much. You want enough filling to be satisfying but not so much that it’s difficult to eat or handle. This is where the beauty of the individual servings really shines.
Adding the Finishing Touches
With your strawberries filled, it’s time to add the vibrant red and blue elements to complete the patriotic theme. For the “red” layer, you’ll be using the strawberries themselves, which are already a beautiful crimson hue. The “white” is provided by our luscious cheesecake filling. Now, for the “blue,” we’ll use fresh blueberries. Take your 36 fresh blueberries and artfully place them on top of the cheesecake filling. You can arrange them in a pattern, like three blueberries per strawberry half, or scatter them for a more whimsical look. The blueberries add a lovely pop of color and a burst of fresh, slightly tart flavor that contrasts beautifully with the creamy filling and sweet strawberries. Ensure they are nestled securely into the filling so they don’t roll off.
Chill and Serve!
Once all your strawberries are filled and topped with blueberries, it’s time to let the flavors meld and the filling set slightly. Carefully transfer your serving platter or baking sheet to the refrigerator. Allow the Red, White, and Blue Cheesecake Strawberries to chill for at least 30 minutes. This chilling time is important not only for allowing the filling to firm up a bit more but also for ensuring all the flavors have a chance to come together. Serving them chilled makes them incredibly refreshing, especially on a warm day. When you’re ready to serve, arrange them on a beautiful platter. You can even add a light dusting of powdered sugar for an extra touch of elegance, though it’s entirely optional. These are best enjoyed the same day they are made for optimal freshness and texture, but leftovers (if there are any!) can be stored in an airtight container in the refrigerator for up to a day. Enjoy your delicious and visually stunning patriotic dessert!
Conclusion:
There you have it – a delightful and visually stunning recipe for Red, White, and Blue Cheesecake Strawberries that’s sure to impress. This recipe is fantastic because it combines the fresh, sweet burst of strawberries with a creamy, decadent cheesecake filling, all presented in a patriotic pnon-alcoholic alette perfect for any summer celebration or holiday gathering. They’re surprisingly easy to make, offering a sophisticated dessert without the fuss of baking a full cheesecake. I love how versatile they are; they can be a charming appetizer, a light dessert, or even a sweet treat to pack for a picnic. The vibrant colors are a guaranteed crowd-pleaser, and the flavor combination is simply irresistible.
When serving, consider arrangin extractg them on a platter for a festive centerpiece. They’re also wonderful served individually in mini muffin liners or small dessert cups. For variations, feel free to experiment with different types of berries like raspberries or blueberries, or even a touch of lemon zest in the cheesecake filling for an extra zing. Don’t be afraid to add a drizzle of white chocolate or a sprinkle of edible glitter for added flair. I truly encourage you to give these Red, White, and Blue Cheesecake Strawberries a try; they’re a guaranteed hit and a joyful way to celebrate any occasion!
Frequently Asked Questions:
How far in advance can I make these cheesecake strawberries?
You can prepare these cheesecake strawberries up to 24 hours in advance. It’s best to assemble them and then store them in an airtight container in the refrigerator. The strawberries will retain their freshness and the cheesecake filling will set nicely. Just be aware that the strawberries might release a little juice over time, so for the absolute freshest presentation, assembling them a few hours before serving is ideal.
Can I use frozen strawberries?
While fresh strawberries are recommended for the best texture and flavor, you can technically use frozen strawberries. However, you’ll need to thaw them completely and drain them very thoroughly to remove excess moisture, as this can make the cheesecake filling watery. The texture might be slightly softer than with fresh strawberries.
What if I don’t like cream cheese?
If cream cheese isn’t your preference, you can try substituting it with mascarpone cheese for a richer, smoother filling, or even a combination of Greek yogurt and a touch of honey for a lighter, tangier option. You might need to adjust the sweetness and consistency depending on your chosen alternative.
Red, White, and Blue Cheesecake Strawberries
A festive and easy no-bake dessert featuring cheesecake-filled strawberries and blueberries, perfect for patriotic holidays.
Ingredients
-
1 (8-ounce) package cream cheese, softened
-
1/2 cup confectioners’ sugar
-
1 cup whipped topping, thawed
-
1/2 teaspoon almond extract
-
12 large strawberries, cut in half
-
36 blueberries
Instructions
-
Step 1
In a medium bowl, beat together the softened cream cheese and confectioners’ sugar until smooth. -
Step 2
Gently fold in the thawed whipped topping and almond extract until just combined. -
Step 3
Hollow out the cut side of each strawberry half slightly to create a well for the filling. -
Step 4
Spoon or pipe the cream cheese mixture into the hollowed-out strawberries. -
Step 5
Top each filled strawberry with a few blueberries to create the red, white, and blue effect. -
Step 6
Chill for at least 30 minutes before serving.
Important Information
Nutrition Facts (Per Serving)
It is important to consider this information as approximate and not to use it as definitive health advice.
Allergy Information
Please check ingredients for potential allergens and consult a health professional if in doubt.