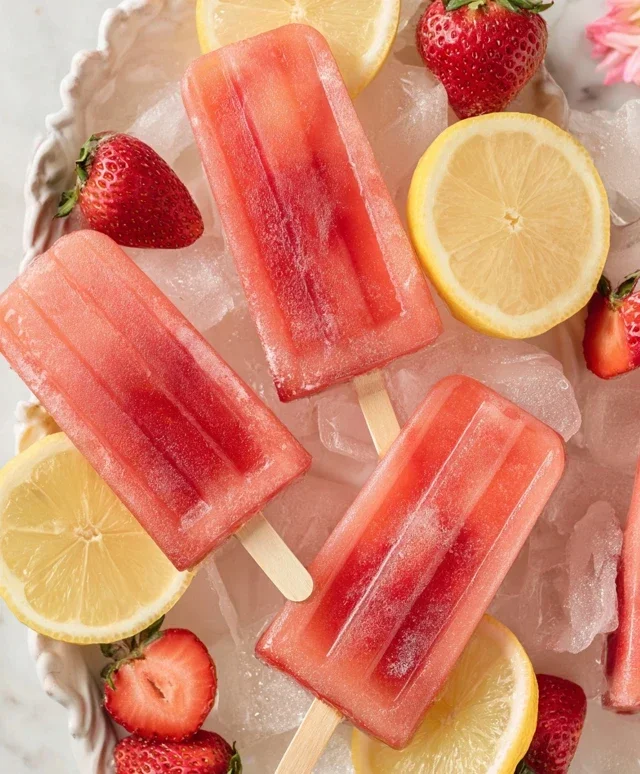
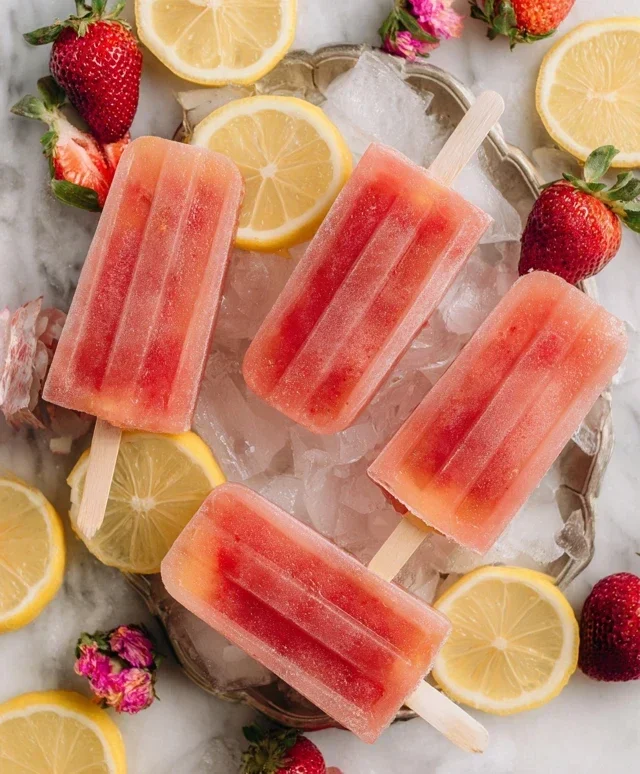
Refreshing Strawberry Lemonade Popsicles-Easy Treat
Strawberry Lemonade Popsicles are the quintessential frozen treat for a reason, and I’m so excited to share my favorite recipe with you! When the sun starts to blaze and the desire for something cool and refreshing hits, nothing quite compares to the vibrant burst of flavor in a homemade Strawberry Lemonade Popsicle. It’s that perfect harmony of sweet, juicy strawberries and zesty, tangy lemonade that just screams summer. What makes these so special? It’s the simplicity, the natural goodness, and the undeniable joy they bring. Forget those artificial-tasting store-bought versions; with just a few fresh ingredients, you can craft a batch of these delightful popsicles that will have everyone beggin extractg for more. They’re incredibly easy to make, making them a fantastic activity to do with kids, and the result is a guilt-free, utterly delicious way to beat the heat.
Get ready to chill!
Your new favorite summer staple awaits.
Strawberry Lemonade Popsicles
There’s something undeniably magical about a perfectly chilled popsicle on a warm day. It’s an instant mood booster, a refreshing escape, and a taste of pure summer bliss. And when you combine the zesty tang of lemonade with the sweet burst of fresh strawberries, you create a flavor sensation that’s truly irresistible. These Strawberry Lemonade Popsicles are incredibly easy to make, requiring minimal effort for maximum reward. They’re the perfect way to use up those ripe strawberries and a fantastic treat to have on hand for unexpected cravings or impromptu backyard gatherings. Forget store-bought options filled with artificial flavors and excessive sugar; making your own allows you to control the ingredients and tailor the sweetness to your liking. Get ready to elevate your popsicle game with this simple yet spectacular recipe!
Ingredients:
Instructions:
This recipe is designed for simplicity and maximum flavor. We’re going to let the natural goodness of the strawberries and the bright punch of the lemonade shine through. The beauty of these popsicles lies in their straightforward preparation. No complex techniques, just a few easy steps to delicious frozen perfection.
Preparing the Strawberries
The first step is to get our star fruit, the strawberries, ready. Start by thoroughly washing your 1 cup of fresh strawberries under cool running water. This ensures that any dirt or residue is removed, leaving you with clean, vibrant berries. Once washed, it’s time to hull them, which means removing the green leafy tops. You can do this with a small paring knife, carefully cutting around the core. After hulling, dice the strawberries into small, manageable pieces. Aim for pieces that are roughly ¼ inch to ½ inch in size. This will ensure that you get a nice distribution of strawberry chunks throughout your popsicles, providing delightful little bursts of flavor and texture with every lick. If you prefer a smoother popsicle with less distinct pieces, you can finely mince the strawberries or even lightly mash them with a fork before adding them to the lemonade. For those who enjoy a sweeter treat, you can add 1 tablespoon of granulated sugar to the diced strawberries at this stage. Gently toss the strawberries with the sugar, allowing it to start dissolving and drawing out some of the natural juices from the fruit. This step is entirely optional, as Simply Lemonade is already sweetened, but it can help enhance the strawberry flavor and add a touch more sweetness if that’s your preference.
Assembling the Popsicle Mixture
Now for the exciting part: combining our delicious ingredients! Take your container of Simply Lemonade. If you’ve chosen to add sugar to your strawberries, make sure they are well-mixed. Pour the entire container of Simply Lemonade into a large bowl or pitcher. It’s important to have enough space to stir everything together thoroughly without spillage. Next, carefully add the prepared diced strawberries (and optional sugar, if used) to the lemonade. This is where the magic begin extracts to happen, as the vibrant red of the strawberries will start to infuse the lemonade, creating beautiful swirls of color. Using a long spoon or a whisk, gently stir the mixture. You want to distribute the strawberries evenly throughout the lemonade. Don’t over-stir to the point of completely breaking down the strawberry pieces unless that is your desired texture. The goal is to ensure that each popsicle mold will receive a good amount of both lemonade and strawberry. Give it a good stir for about 30 seconds to a minute, ensuring everything is well incorporated. You can also taste the mixture at this point to adjust the sweetness if needed. If you find it not sweet enough, you can add a touch more sugar or even a drizzle of honey, stirring until dissolved.
Filling the Popsicle Molds
With your delightful strawberry lemonade mixture ready, it’s time to fill your popsicle molds. Ensure your popsicle molds are clean and dry before you begin extract. Carefully pour or ladle the strawberry lemonade mixture into each mold. It’s best to fill them almost to the very top, leaving just a tiny bit of space for expansion as the liquid freezes. This prevents any overflow and ensures you get a full, well-formed popsicle. If your molds have individual sticks that you insert as you fill, do so now according to the manufacturer’s instructions. If your molds have a tray that holds the sticks in place once all are filled, you can add the mixture to all the molds first and then place the tray with the sticks. A funnel can be very helpful here if your popsicle molds have small openings, preventing drips and making the filling process much cleaner. Be sure to wipe away any drips on the outside of the molds with a paper towel; frozen drips can make them tricky to unmold later.
Freezing and Enjoying
Once your popsicle molds are filled and ready, it’s time to send them on their chilly journey. Carefully place the filled molds into your freezer. It’s a good idea to place them on a flat surface within the freezer to ensure they freeze evenly and upright. Now comes the waiting game! Allow the popsicles to freeze completely. This typically takes at least 4 to 6 hours, but for the best results and a solid freeze, it’s recommended to leave them overnight. Patience is key here! Once the popsicles are fully frozen, it’s time for the best part: enjoying your homemade creations. To unmold them, you can briefly run the outside of the mold under warm water for a few seconds. This gentle warmth will loosen the popsicle from the mold, allowing you to easily pull it out. Be careful not to run the water for too long, or your popsicle will start to melt! Peel away the mold and savor the refreshing, fruity goodness. These Strawberry Lemonade Popsicles are best enjoyed immediately after unmolding, allowing you to experience their full, icy perfection. They are a delightful and healthy way to cool down and a fantastic treat for all ages. Store any leftover popsicles back in the freezer, ideally in an airtight container or zip-top bag to prevent freezer burn.
Conclusion:
There you have it – a wonderfully simple and incredibly refreshing Strawberry Lemonade Popsicle recipe that’s perfect for beating the heat and adding a burst of sunshine to your day! This recipe is a winner because it uses just a few fresh ingredients to create a vibrant, naturally sweet treat that both kids and adults will adore. The tangy lemonade beautifully complements the sweet strawberries, resulting in a flavor explosion that’s far superior to any store-bought alternative. They’re not only delicious but also a fantastic way to enjoy the bounty of strawberry season.
Feel free to get creative with serving! These popsicles are fantastic on their own as a delightful dessert or a midday pick-me-up. You can also serve them alongside a summer barbecue or at a birthday party for a fun and festive touch. For variations, consider adding a few fresh mint leaves to the blender for an extra layer of cool flavor, or even a splash of sparkling water for a fizzy twist. Don’t be afraid to experiment with different berry combinations too – raspberry lemonade popsicles are equally divine!
I truly encourage you to give this Strawberry Lemonade Popsicle recipe a try. It’s incredibly rewarding to make your own frozen treats, and the satisfaction of enjoying something so delicious that you created yourself is immense. Happy popsicle making!
Frequently Asked Questions:
Can I make these popsicles without a popsicle mold?
Absolutely! If you don’t have popsicle molds, you can use small paper cups or even clean yogurt containers. Just place a craft stick or even a sturdy spoon handle into the center before freezing. You might need to secure the stick with a bit of tape on the outside of the cup for stability.
How long do the popsicles take to freeze?
Typically, Strawberry Lemonade Popsicles will take about 4-6 hours to freeze completely. For best results and to ensure they are firm, it’s a good idea to leave them overnight in the freezer. This guarantees a perfectly frozen, enjoyable treat.
What if I don’t have fresh strawberries?
You can certainly use frozen strawberries for this recipe! Simply thaw them slightly before blending. The flavor might be a little more intense with frozen strawberries, which can be a delightful outcome. Just be sure to adjust the sweetness if needed, as some frozen fruit can be sweeter than fresh.
Strawberry Lemonade Popsicles
Refreshing and easy-to-make strawberry lemonade popsicles perfect for a hot day. Combines the tartness of lemonade with the sweetness of fresh strawberries.
Ingredients
-
1 container Simply Lemonade
-
1 cup strawberries, diced
-
1 TBSP sugar
-
1/2 cup water
-
1/4 cup fresh mint leaves, chopped
-
1/2 teaspoon lemon zest
Instructions
-
Step 1
In a small bowl, combine the diced strawberries and sugar. Let sit for 10 minutes to macerate. -
Step 2
In a medium bowl, combine the Simply Lemonade, macerated strawberries (with their juice), and lemon zest. -
Step 3
Stir in the chopped mint leaves. -
Step 4
Pour the mixture into popsicle molds, filling them about 3/4 full. -
Step 5
Insert popsicle sticks into the center of each mold. -
Step 6
Freeze for at least 4-6 hours, or until completely solid. -
Step 7
To unmold, run the popsicle molds under warm water for a few seconds.
Important Information
Nutrition Facts (Per Serving)
It is important to consider this information as approximate and not to use it as definitive health advice.
Allergy Information
Please check ingredients for potential allergens and consult a health professional if in doubt.