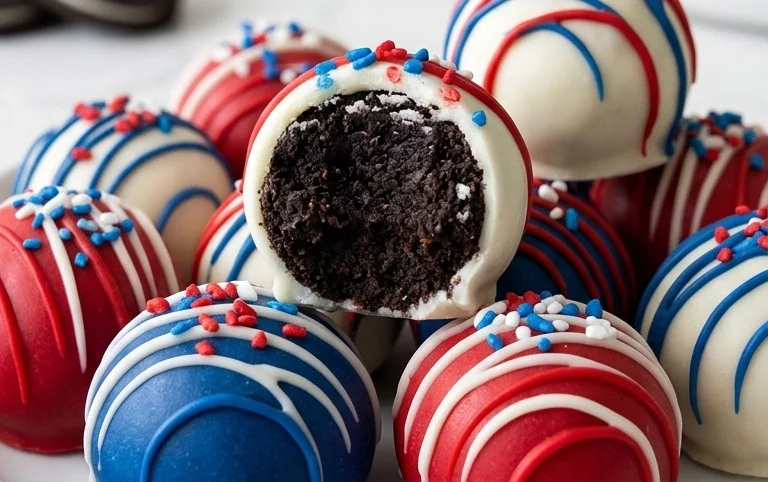
Patriotic Oreo Balls Easy Festive Treat
Patriotic Oreo Balls are the ultimate crowd-pleasing treat, perfect for any celebration that calls for a splash of red, white, and blue! These delightful no-bake confections are surprisingly simple to make, yet they deliver an explosion of flavor and festive charm that everyone adores. Imagin extracte biting into a rich, chocolatey center, perfectly balanced by the sweet creaminess of the crushed Oreos, all enrobed in a vibrant, patriotic coating. What makes these Patriotic Oreo Balls so special is their incredible versatility; they’re not just for the Fourth of July! Think Memorial Day picnics, Labor Day BBQs, or even just a fun way to brighten up a summer afternoon. They’re the perfect bite-sized dessert that’s both visually stunning and incredibly delicious, guaranteed to disappear in a flash!
Get Ready to Impress!
Let’s Dive In!

Patriotic Oreo Balls
Get ready to wow your guests and celebrate any occasion with these incredibly easy and undeniably delicious Patriotic Oreo Balls! Perfect for Fourth of July parties, Memorial Day picnics, or even just a fun afternoon treat, these no-bake wonders are a guaranteed crowd-pleaser. The vibrant red, white, and blue colors, combined with the classic Oreo flavor, make them a festive and irresistible delight. Don’t be intimidated by the dipping and decorating; I’ll walk you through every step to ensure your Oreo Balls are as beautiful as they are tasty. Let’s dive into creating these patriotic masterpieces!
Ingredients:
Getting Started: Preparing the Oreo Base
The foundation of our delicious Oreo Balls is a simple yet magical combination of crushed Oreos and cream cheese. For this recipe, we’re using a generous family-size package of Oreo cookies, which is about 54 cookies in total. Make sure to have them ready to go. The cream cheese is crucial for binding everything together and adding that essential creamy texture. It’s really important that the cream cheese is softened to room temperature. If it’s too cold, it will be difficult to mix thoroughly with the cookie crum extractbs, resulting in a lumpy mixture. To soften it quickly, you can unwrap the cream cheese and let it sit on the counter for about an hour, or even cut it into smaller cubes to speed up the process.
Now, for the crushing! You can do this in a food processor, which is the quickest and easiest method for achieving a fine, even crum extractb. Simply pulse the Oreo cookies (fillings and all – don’t worry about removing them!) until they resemble fine breadcrum extractbs. If you don’t have a food processor, you can place the cookies in a sturdy zip-top bag, seal it tightly, and then crush them using a rolling pin or the bottom of a heavy pan. Aim for a consistent texture, as this will make it easier to form the balls and ensure they hold their shape. Once crushed, transfer the Oreo crum extractbs to a large mixing bowl.
Add the softened cream cheese to the bowl with the Oreo crum extractbs. Using a sturdy spatula or a wooden spoon, mix the cream cheese and cookie crum extractbs together until they are thoroughly combined. This is where the magic happens! The mixture will start to come together and become moldable. It might feel a bit sticky, but that’s perfectly normal. Ensure there are no streaks of cream cheese left visible; you want a uniform, cohesive dough.
Forming the Oreo Balls
Once your Oreo and cream cheese mixture is well combined, it’s time to form the balls. For consistent results and a beautiful presentation, I recommend using a small cookie scoop or a tablespoon to portion out the mixture. Roll each portion between your palms to form smooth, compact balls, about 1 inch in diameter. The mixture can be a little sticky, so you might find it helpful to lightly dampen your hands with water or a tiny bit of vegetable oil if they start sticking too much. Place the formed balls on a baking sheet lined with parchment paper. Parchment paper is your friend here, as it prevents sticking and makes for easy cleanup.
As you form the balls, place them close together on the baking sheet. This will allow them to firm up nicely. Once all the mixture has been rolled into balls, it’s time to let them chill. This chilling step is absolutely critical for the next stage – dipping them in candy melts. Pop the entire baking sheet into the freezer for about 15-20 minutes, or into the refrigerator for at least 30-45 minutes. You want them to be firm enough to hold their shape when dipped in the melted candy, but not so frozen that the candy coating cracks. This chilling process makes them much easier to handle and ensures a smooth coating.
Melting and Dipping: The Colorful Transformation
Now for the most visually exciting part: the candy melts! We’ll be using red and blue candy melts to create our patriotic theme. You’ll also need the Ghirardelli white melting wafers for a contrasting color and a touch of sweetness. Melting candy melts is similar to melting chocolate, but they are specifically formulated for ease of use and a smooth finish. The best way to melt them is in a microwave-safe bowl.
Place the red candy melts in one bowl and the blue candy melts in another. Microwave them in 30-second intervals, stirring well after each interval, until they are completely smooth and melted. Be patient! Overheating candy melts can cause them to seize up and become unusable. Once melted, set aside. For the white melting wafers, you’ll melt them in a separate small bowl using the same method.
To dip the Oreo balls, take your chilled balls out of the freezer or refrigerator. You can dip them one at a time. Hold an Oreo ball with a fork or a dipping tool, and carefully lower it into the melted candy. Gently rotate the ball to ensure it’s completely coated. Lift the ball out and let any excess candy drip back into the bowl. If you’re having trouble getting a smooth coating, you can try adding a tiny bit of paramount crystals or vegetable oil to thin the candy melts slightly, but be very cautious not to add too much. Gently tap the fork on the side of the bowl to encourage any excess to drip off.
Decorating with Stars and Stripes
This is where your creativity shines! For the red and blue dipped balls, you can create stripes or swirls. For stripes, take a toothpick or a small piping bag filled with melted white candy and drizzle thin lines across the dipped balls. For swirls, you can alternate dipping the balls in red and blue, or even dip one half in red and the other half in blue.
To achieve a beautiful blue and white effect, you can dip a portion of the balls in the blue candy melts. Once those are set slightly, you can drizzle or swirl some of the melted white candy over them. Or, for a classic look, dip half of your Oreo balls in the red candy melts and the other half in the blue candy melts.
Before the candy coating fully sets, it’s time to add those festive white star confetti sprinkles. This is the easiest way to add a patriotic touch. Simply sprinkle the stars generously over the still-wet candy coating. The sprinkles will adhere perfectly, giving your Oreo Balls that quintessential star-spangled look. If you’re going for a red, white, and blue striped effect, you might want to dip some balls entirely in white, then add red and blue stripes, or vice versa. The possibilities are endless!
Final Chilling and Serving
Once all your Oreo Balls are dipped and decorated, place them back on the parchment-lined baking sheet. At this point, you’ll want to let them set completely. You can leave them at room temperature if your kitchen isn’t too warm, but for the quickest and most secure setting, pop them back into the refrigerator for about 30 minutes, or until the candy coating is firm to the touch. This will ensure they hold their shape and are easy to handle.
Once they are fully set, your Patriotic Oreo Balls are ready to be enjoyed! Arrange them on a festive platter or in a cute container. They make fantastic party favors, potluck contributions, or just a delightful homemade treat to share. You can store any leftovers in an airtight container in the refrigerator for up to a week. They are best enjoyed at room temperature, so if you refrigerate them, allow them to sit out for about 15-20 minutes before serving to achieve the perfect creamy texture. Happy celebrating!
Conclusion:
I hope you’ve enjoyed learning how to make these delightful Patriotic Oreo Balls! They truly are a showstopper for any festive occasion, offering that perfect combination of rich chocolatey goodness and creamy, dreamy filling. Their simplicity makes them incredibly accessible, even for begin extractner bakers, yet their impressive appearance guarantees rave reviews. Whether you’re celebrating the Fourth of July, Memorial Day, or any event where a touch of red, white, and blue is in order, these treats are sure to be a hit. I encourage you to give this recipe a try; I promise you won’t be disappointed!
These versatile Patriotic Oreo Balls are fantastic served on a platter at any barbecue or potluck. They also make wonderful edible gifts, beautifully packaged in cello bags tied with a festive ribbon. For a more elaborate dessert table, consider pairing them with other patriotic-themed treats. Don’t be afraid to get creative with variations! You could try using different colored candies for coating, adding a sprinkle of edible glitter, or even incorporating a hint of peppermint extract into the cream cheese mixture for an extra flavor kick. The possibilities are endless!
Frequently Asked Questions:
Can I make these Patriotic Oreo Balls ahead of time?
Absolutely! In fact, I recommend making them at least a few hours, or even a day, in advance. This allows the flavors to meld beautifully and ensures the balls are firm and easy to handle. Store them in an airtight container in the refrigerator.
What is the best way to store leftover Oreo Balls?
For the best freshness and texture, store any leftover Patriotic Oreo Balls in an airtight container in the refrigerator. They should stay delicious for up to a week.
Can I use a different type of cookie besides Oreos?
While Oreos provide that signature flavor and texture, you could experiment with other chocolate sandwich cookies. However, the classic Oreo is the heart of this recipe, so I’d stick with them for that authentic taste!
Patriotic Oreo Balls
Festive and easy-to-make Oreo balls decorated in red, white, and blue for patriotic celebrations.
Ingredients
-
1 lb 2.12 oz Family Size package Oreo Cookies
-
8 ounce block cream cheese (softened to room temperature)
-
12 ounce bag red candy melts
-
12 ounce bag blue candy melts
-
⅓ cup Ghirardelli white melting wafers
-
White star confetti sprinkles for topping
Instructions
-
Step 1
Crush the Oreo cookies in a food processor until fine crumbs form. -
Step 2
In a large bowl, combine the Oreo crumbs and softened cream cheese. Mix until well combined and forms a dough-like consistency. -
Step 3
Roll the mixture into small balls, about 1 inch in diameter, and place them on a parchment-lined baking sheet. -
Step 4
Melt the red and blue candy melts separately in microwave-safe bowls, stirring every 30 seconds until smooth. Melt the white melting wafers separately. -
Step 5
Dip the Oreo balls into the melted candy melts, ensuring they are fully coated. Let excess drip off. For a striped effect, alternate dipping in red and blue. -
Step 6
Drizzle with melted white chocolate and immediately sprinkle with white star confetti while the chocolate is still wet. Repeat for desired decoration. -
Step 7
Place the decorated Oreo balls back on the parchment-lined baking sheet and refrigerate for at least 30 minutes to allow the candy coating to set.
Important Information
Nutrition Facts (Per Serving)
It is important to consider this information as approximate and not to use it as definitive health advice.
Allergy Information
Please check ingredients for potential allergens and consult a health professional if in doubt.