No Bake Oreo Nutella Cheesecake Recipe
No Bake Oreo Nutella Cheesecake is a dessert dream come true, and I’m so excited to share this recipe with you! If you’re anything like me, the thought of combining rich, creamy cheesecake with the irresistible duo of crunchy Oreos and smooth Nutella is enough to make your mouth water. This No Bake Oreo Nutella Cheesecake isn’t just a dessert; it’s an experience. It’s that perfect sweet escape, requiring zero oven time and delivering maximum flavor impact. People adore this cheesecake because it’s unbelievably easy to whip up, yet it tastes like it came straight from a gourmet bakery. What makes this specific No Bake Oreo Nutella Cheesecake so special is the perfect balance – the subtle bitterness of the Oreos cutting through the sweet, nutty hazelnut spread, all enveloped in a luxuriously smooth and decadent cheesecake filling. Get ready to impress yourself and everyone you share it with!
No Bake Oreo Nutella Cheesecake
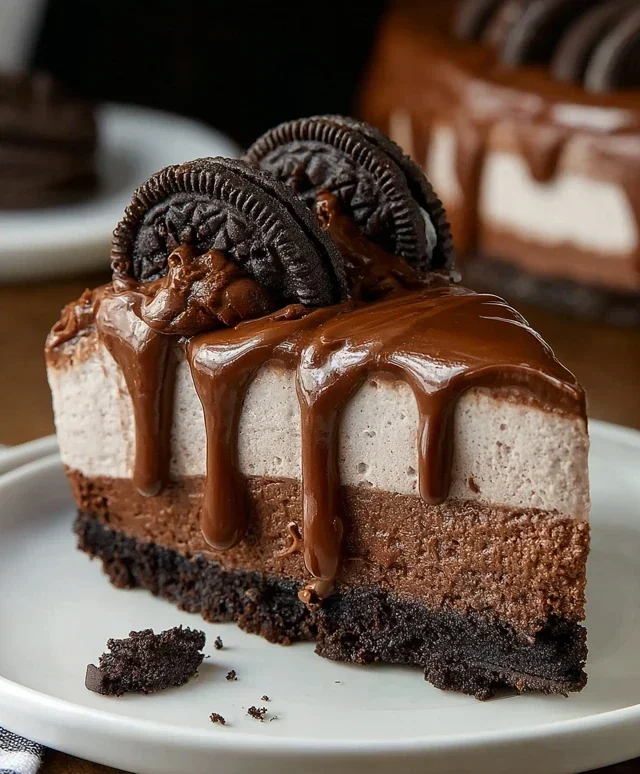
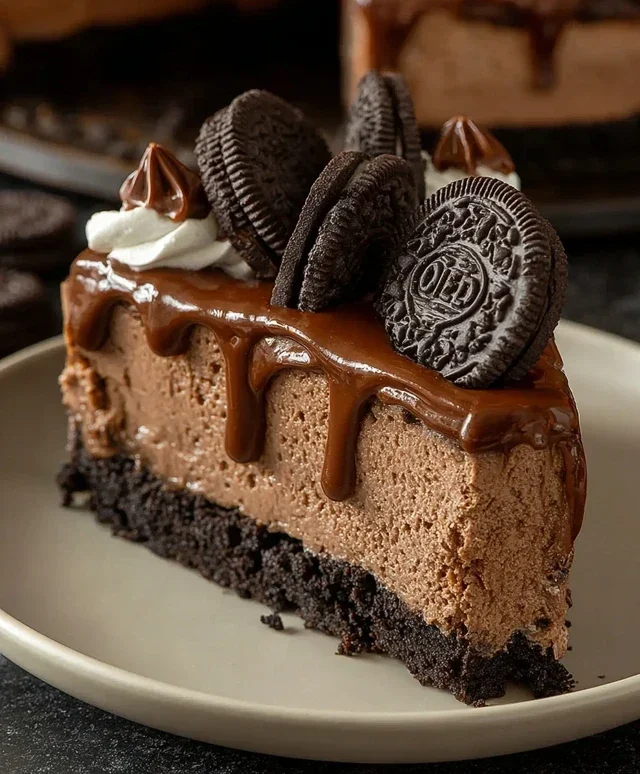
Prepare to be amazed by this incredibly decadent and surprisingly simple No Bake Oreo Nutella Cheesecake. This dessert is a dream come true for any chocolate and hazelnut lover, combining the classic, addictive crunch of Oreos with the rich, irresistible spread of Nutella in a lusciously creamy cheesecake filling. The best part? No oven required! This makes it the perfect treat for any occasion, from a last-minute dessert craving to a show-stopping centerpiece for your next gathering. Imagin extracte a thick, buttery Oreo crust giving way to a smooth, velvety filling swirled with even more Nutella, all topped with a generous drizzle and delightful chocolatey crunch. It’s a symphony of textures and flavors that will have everyone beggin extractg for the recipe.
Ingredients:
Instructions:
Step 1: Crafting the Irresistible Oreo Crust
The foundation of any great cheesecake is its crust, and for this No Bake Oreo Nutella Cheesecake, we’re going straight for the beloved Oreo. First, ensure your Oreos are finely crushed. You can achieve this by placing them in a food processor and pulsing until they form fine crum extractbs. If you don’t have a food processor, a sturdy zip-top bag and a rolling pin will do the trick wonderfully. The key is to get them as fine as possible so they bind well. In a medium bowl, combine the 200g of crushed Oreos with the 50g of melted butter. Stir them together until all the crum extractbs are moistened and the mixture resembles wet sand. This butter will act as the glue for our crust. Now, take your chosen cheesecake pan (a 20-23cm springform pan is ideal for easy removal) and pour the Oreo mixture into the bottom. Using the back of a spoon or a flat-bottomed glass, firmly press the crum extractbs evenly across the base of the pan to form a compact and sturdy crust. You want it to be well-compacted so it doesn’t crum extractble when you slice into the cheesecake. Place this prepared crust in the freezer for at least 15 minutes while you prepare the filling. This chilling step helps the crust set and firm up, making it easier to slice later.
Step 2: Creating the Dreamy Nutella Cheesecake Filling
Now for the star of the show: the creamy, dreamy Nutella cheesecake filling! In a large mixing bowl, add your 500g of softened cream cheese. It’s crucial that the cream cheese is softened to room temperature; this ensures a smooth, lump-free filling. If your cream cheese is cold, it will be very difficult to blend properly, resulting in a lumpy texture. Beat the cream cheese with an electric mixer on medium speed until it’s completely smooth and creamy. Next, add the 200g of Nutella to the cream cheese. Continue to beat on medium speed until the Nutella is fully incorporated and the mixture is a beautiful, uniform chocolate-hazelnut hue. Scrape down the sides of the bowl as needed to ensure everything is well combined. This is where the magic starts to happen, blending that rich Nutella flavor into the creamy base.
Step 3: Whipping Up the Light and Airy Cream
To achieve that signature airy and light texture in our no-bake cheesecake, we need to whip the heavy cream. In a separate, clean bowl, pour in the 200g of heavy whipping cream. Using an electric mixer fitted with the whisk attachment, begin extract whipping the cream on medium speed. As it starts to thicken, gradually add the 50g of sugar. Continue to whip until stiff peaks form. This means that when you lift the whisk, the cream will stand up straight and hold its shape without collapsing. Be careful not to over-whip, as this can turn your cream into butter. Once you have stiff peaks, gently fold this whipped cream into the Nutella cream cheese mixture. Use a spatula and a gentle folding motion to incorporate the whipped cream without deflating it. You want to maintain as much airiness as possible. The goal is to create a light, fluffy, and incredibly smooth filling.
Step 4: Assembling and Swirling the Decadence
With your crust chilled and your filling ready, it’s time to bring it all together. Take your chilled Oreo crust out of the freezer. Pour about two-thirds of the creamy Nutella filling onto the crust. Spread it evenly with your spatula. Now, take the 100g of Nutella you set aside for swirling and dollop spoonfuls over the filling. Then, gently spoon the remaining one-third of the Nutella cheesecake filling over the top. Add another few dollops of Nutella. Now, take a knife or a skewer and gently swirl the Nutella through the cheesecake filling, creating beautiful marbled patterns. Be careful not to over-mix; you want distinct swirls, not a uniform brown color. Sprinkle the 100g of chopped Oreos evenly over the top of the swirled filling. These little chocolatey bits will add a delightful crunch and extra Oreo flavor.
Step 5: Chilling to Perfection and Garnishing
This is the most important step for a no-bake cheesecake – patience! Carefully cover the cheesecake with plastic wrap, ensuring it doesn’t touch the surface of the filling if possible, or cover it tightly with a lid if your pan has one. Place the cheesecake in the refrigerator and let it chill for at least 6-8 hours, or preferably overnight. This extended chilling time is essential for the cheesecake to set properly and develop its firm, creamy texture. Once thoroughly chilled, it’s time to decorate! Gently remove the sides of your springform pan. Place the 6 whole Oreos strategically on top of the cheesecake for a beautiful presentation. Warm the remaining 100g of Nutella slightly (just a few seconds in the microwave or a brief soak in warm water – you want it pourable, not hot) and drizzle it generously over the top of the cheesecake and the Oreos. Finally, sprinkle the 5 crushed Oreos (without filling) over the Nutella drizzle for an extra textural element. Slice and enjoy this heavenly No Bake Oreo Nutella Cheesecake!
Conclusion:
I hope you’ve enjoyed learning how to make this incredibly decadent No Bake Oreo Nutella Cheesecake! This recipe truly is a showstopper, perfect for any occasion where you want to impress without the stress of baking. The combination of the crunchy Oreo crust, the creamy Nutella-infused cheesecake filling, and the luscious topping is simply irresistible. It’s a guaranteed crowd-pleaser and a fantastic way to satisfy those sweet cravings.
Serving this masterpiece is a delight. I love serving it chilled, either cut into generous slices or even in individual jars for a more elegant presentation. It pairs wonderfully with a scoop of vanilla ice cream or a dollop of whipped cream. For variations, feel free to experiment! You could add a sprinkle of chopped toasted hazelnuts on top for an extra layer of texture, or swirl in some extra Nutella into the filling before it sets for an even more intense flavor. Don’t be afraid to get creative! I highly encourage you to give this No Bake Oreo Nutella Cheesecake a try; you won’t regret it. It’s surprisingly simple to assemble and the results are absolutely divine.
Frequently Asked Questions:
Can I make this cheesecake ahead of time?
Absolutely! This no-bake cheesecake is perfect for making ahead. In fact, it’s best when it has at least 4-6 hours (or even overnight) to chill and set completely. This allows the flavors to meld beautifully and ensures a firm, sliceable texture. Just cover it tightly with plastic wrap once it’s fully set and store it in the refrigerator.
What if I don’t have Oreos? Can I use a different cookie for the crust?
Yes, you can definitely substitute the Oreos! Chocolate grabeef ham crackers or chocolate wafer cookies would also make a delicious crust. Just crush them finely and mix with melted butter as you would with the Oreos. The key is to have a good, sturdy base for your cheesecake.
No Bake Oreo Nutella Cheesecake
A decadent no-bake cheesecake featuring a crushed Oreo crust, a creamy Nutella and cream cheese filling, and topped with more Oreos and a Nutella drizzle.
Ingredients
-
200g crushed Oreos
-
50g melted butter
-
500g cream cheese, softened
-
200g Nutella
-
200g heavy whipping cream (35%)
-
50g sugar
-
100g chopped Oreos
-
100g Nutella
-
100g Nutella, warmed for drizzling
-
5 crushed Oreos (no filling)
-
6 whole Oreos for garnish
Instructions
-
Step 1
Combine crushed Oreos with melted butter and press into the base of a springform pan. Chill for at least 15 minutes. -
Step 2
In a large bowl, beat the softened cream cheese until smooth. Stir in 200g Nutella and sugar until well combined. -
Step 3
In a separate bowl, whip the heavy whipping cream until stiff peaks form. Gently fold the whipped cream into the cream cheese and Nutella mixture. -
Step 4
Fold in 100g chopped Oreos and 100g Nutella into the cheesecake filling. -
Step 5
Pour the filling over the chilled Oreo crust and spread evenly. Chill for at least 4 hours, or until firm. -
Step 6
Before serving, drizzle with warmed 100g Nutella. Garnish with 6 whole Oreos and 5 crushed Oreos (no filling).
Important Information
Nutrition Facts (Per Serving)
It is important to consider this information as approximate and not to use it as definitive health advice.
Allergy Information
Please check ingredients for potential allergens and consult a health professional if in doubt.